Howl Brand Tag
Overview
The Howl Brand Tag is a lightweight javascript tag that enables partners to maximize their performance and unlock valuable article and product level insights in a customized dashboard. Only clients with Howl’s Brand Tag can optimize their campaigns by ROAS and see more comprehensive metrics like revenue and RPC. The tag operates through two events: page impressions and checkouts.
Please note: Both the page impression and checkout events are in compliance with GDPR and CCPA and do not capture personally identifiable information (PII). Additionally, as the tag runs asynchronously in the background, there is no impact to the page load time.
Page Impressions
Page impression events enable Howl to ensure attribution for our partners. These events should be fired on every page except pages on the checkout path and the order confirmation page.
Checkouts
Checkout events allow Howl to accurately capture revenue and conversions in real time. The data gathered by checkout events also powers an experience creators and publishers rely on to track top sellers and give better product recommendations in their content. Checkout events should be fired on your site’s order confirmation page, or the page that loads immediately after they’ve successfully purchased their items.
Adding the Brand Tag
To enable Howl tracking on your site, follow the instruction set that best fits your site setup:
Testing the Brand Tag
Page Impressions
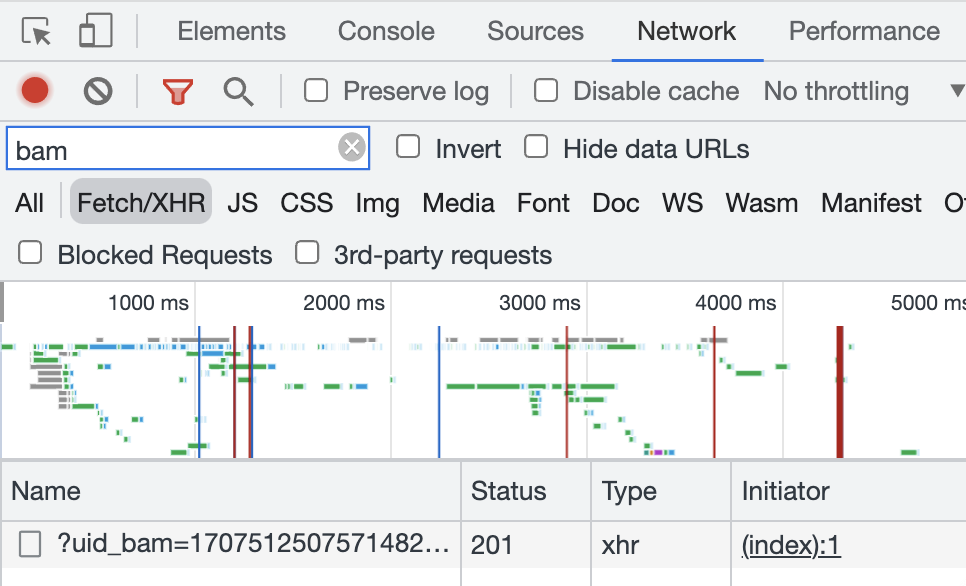
To test the page impression code, filter “bam” in Developer Tools and check for a Fetch/XHR request beginning with ?uid_bam:
Checkouts
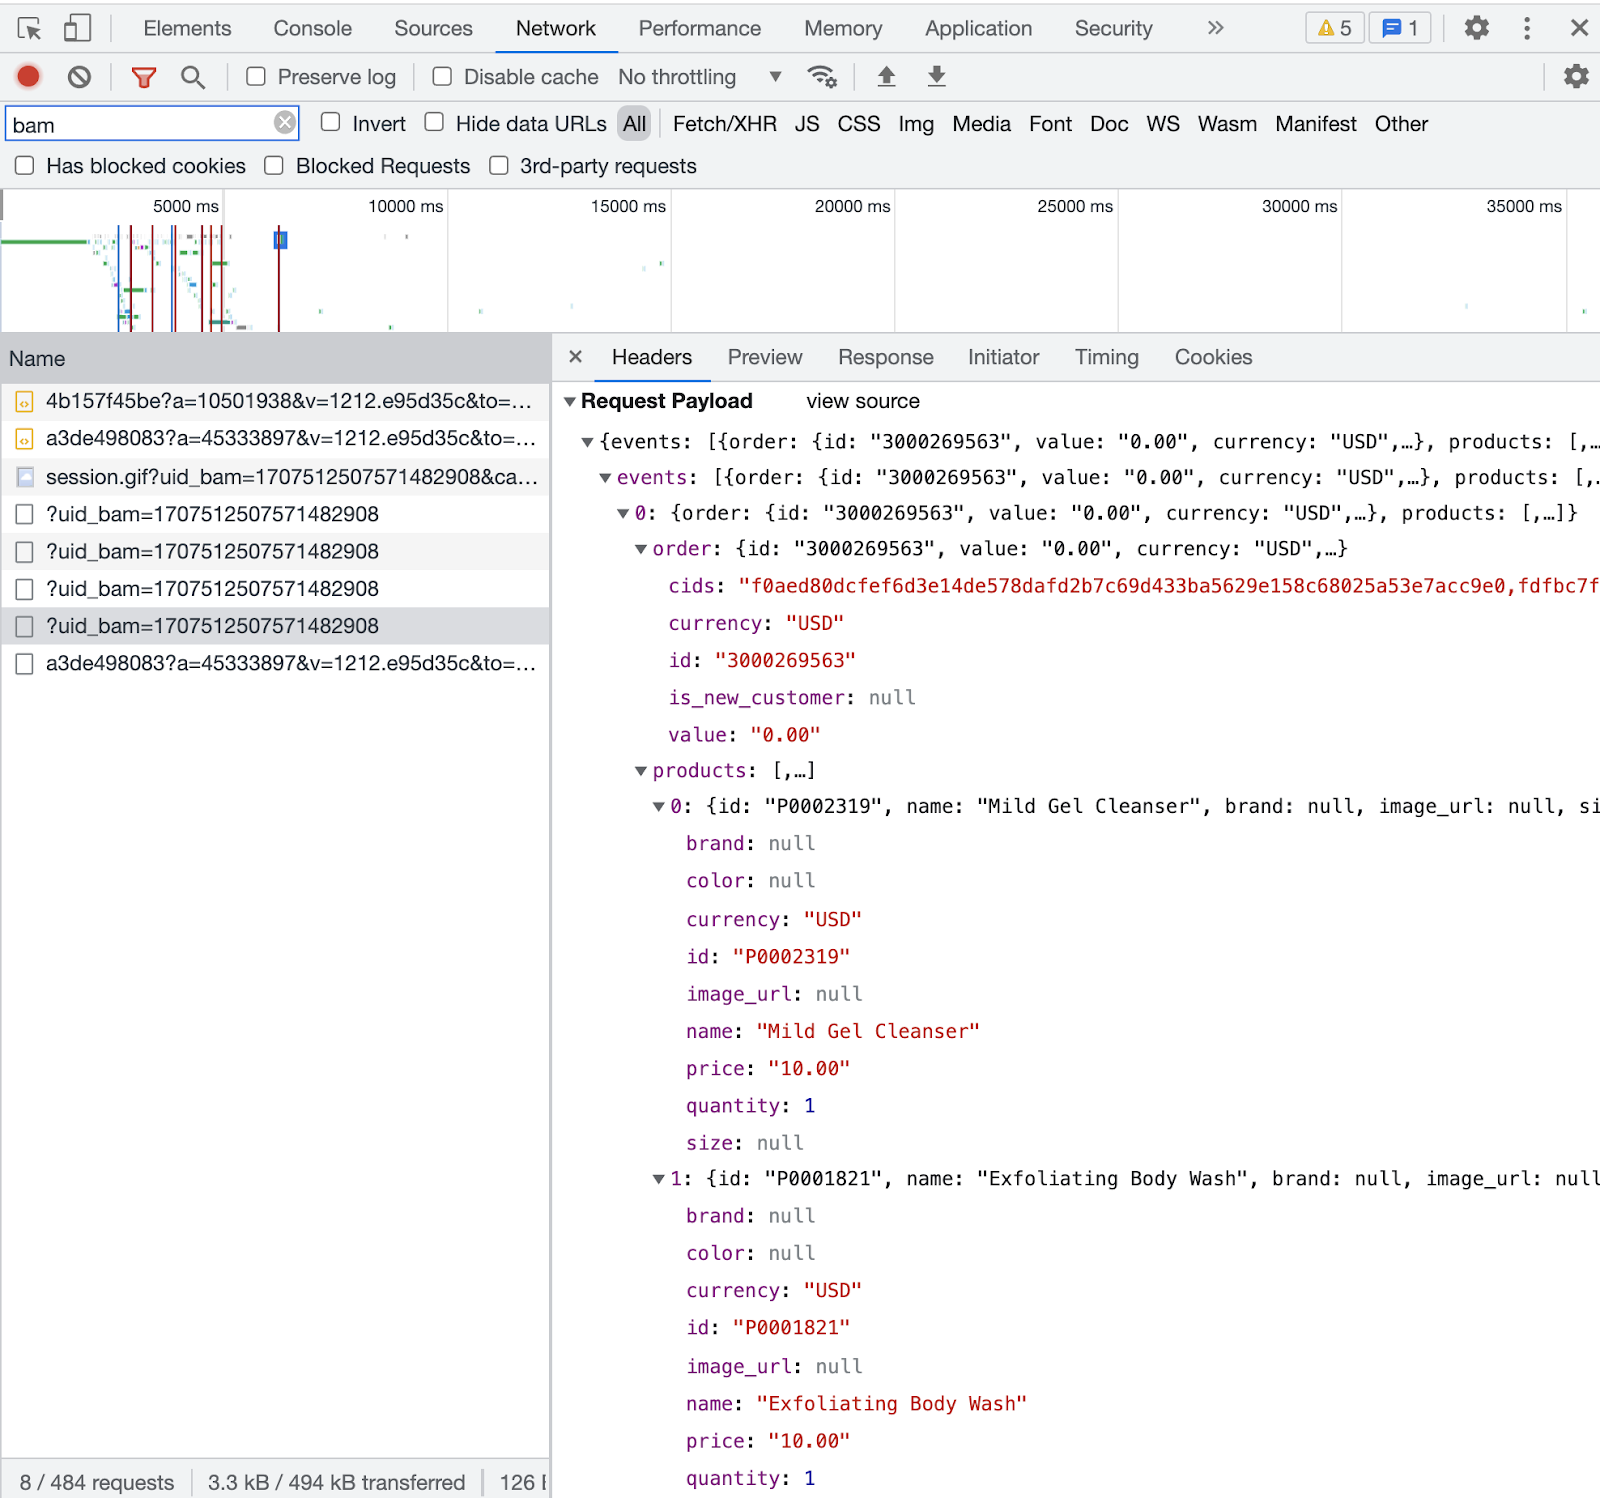
Place an order on your site to test the checkout tag. Similar to the page impression test, be sure to have “bam” filtered in Developer Tools before you place the order. On the confirmation page, you should see an event fired with order details in the Request Payload:
Discount Code Logic
Place an additional test order with a coupon code to ensure the product price variables accurately capture any discounts. You can verify the product price in two ways:
Open the Chrome Developer Tools on Google Chrome before placing the checkout.
Click the Network tab and filter by “narrativ”.
Complete the checkout with a discount code and wait until all redirects have completed. You should be on the order confirmation or order status page.
Click the POST request URL in the form https://events.release.narrativ.com/api/v0/merchants/<id>/interactions/checkout/?uid_bam=<uid>.
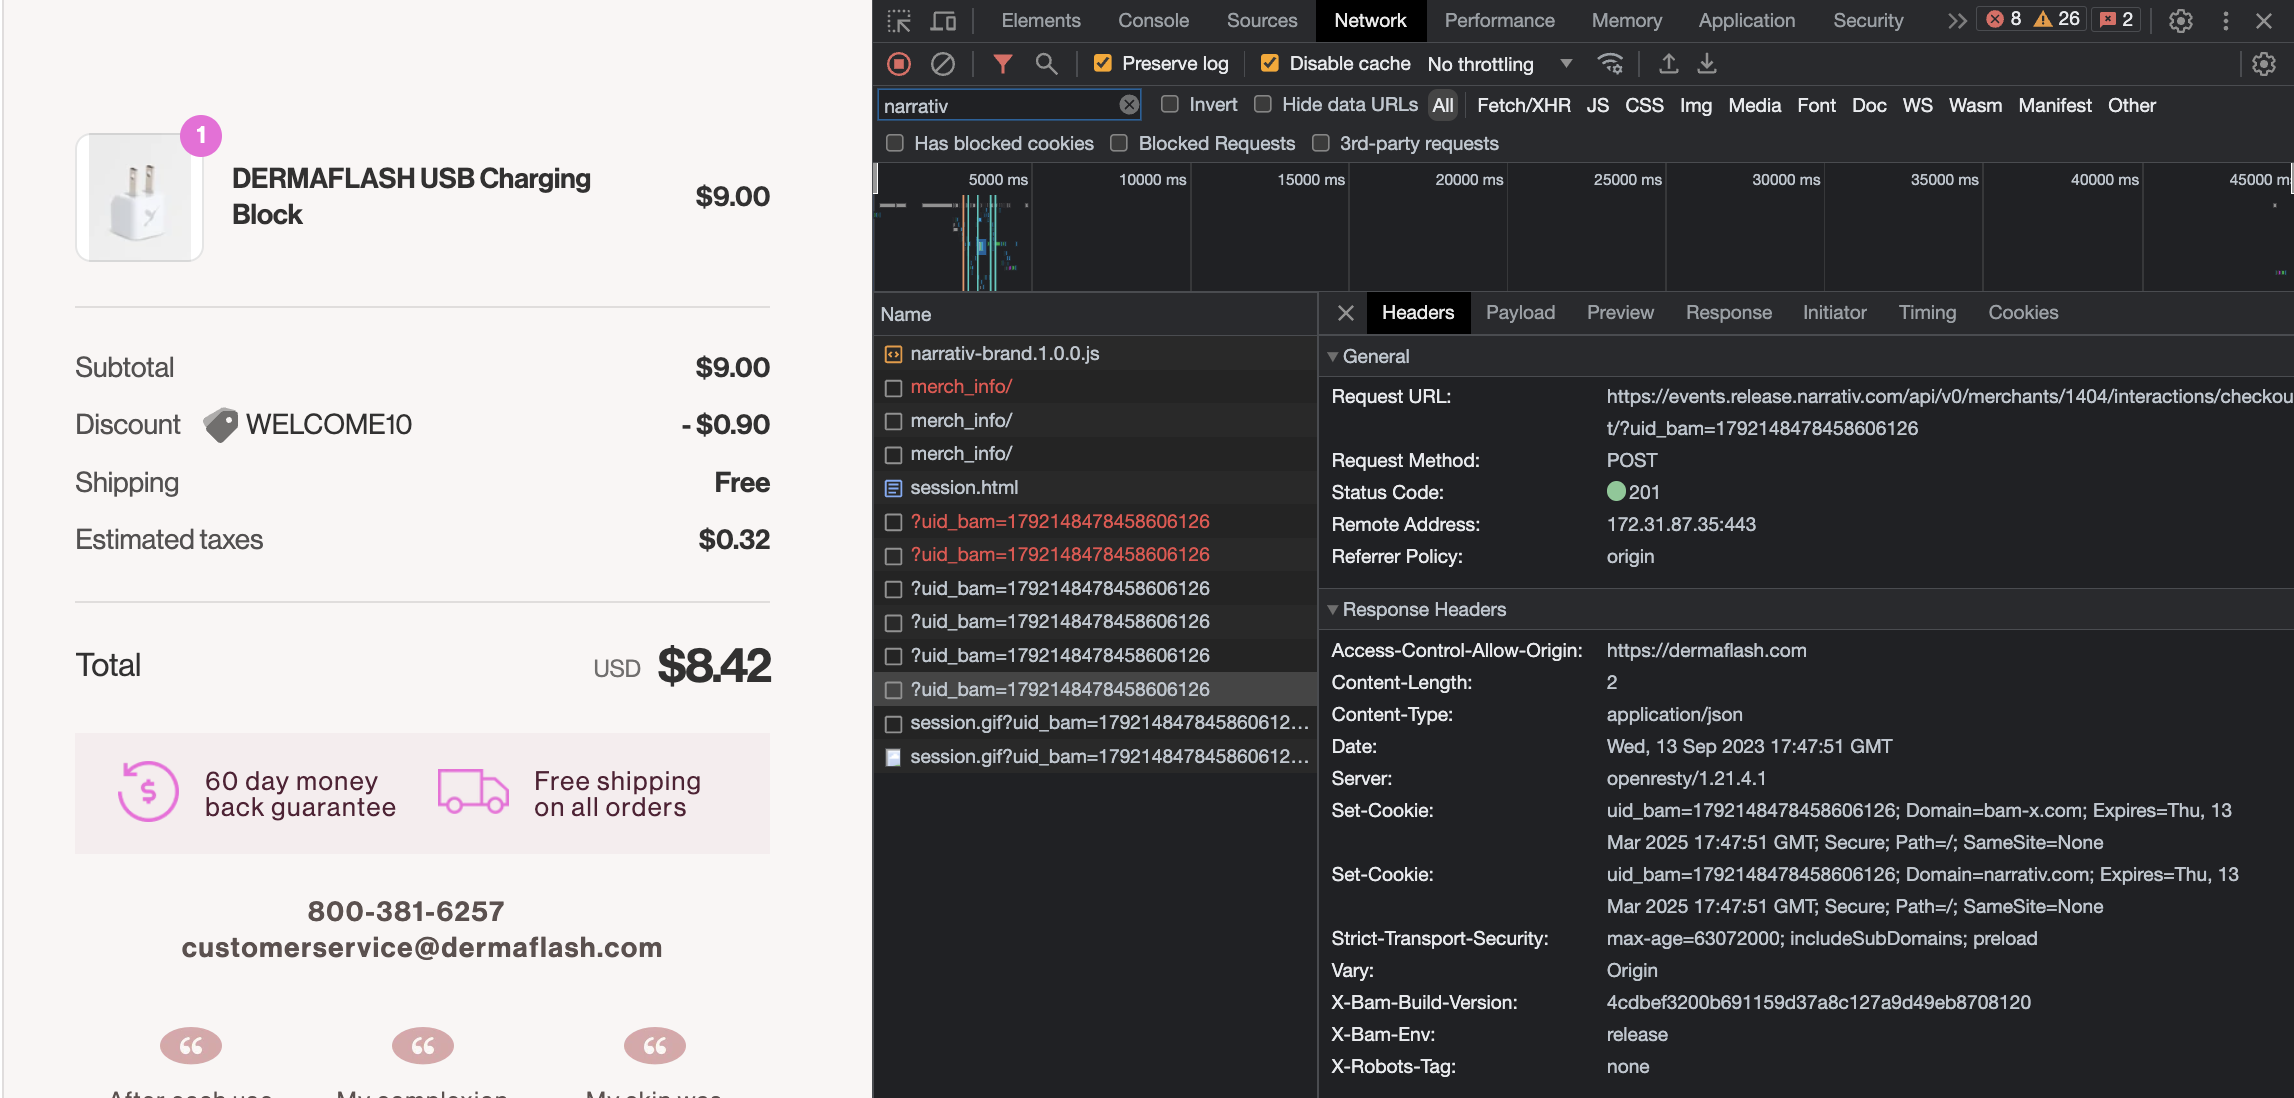
Click the Payload tab and expand the request details.
The list of products should have prices that reflect the discount in the order.
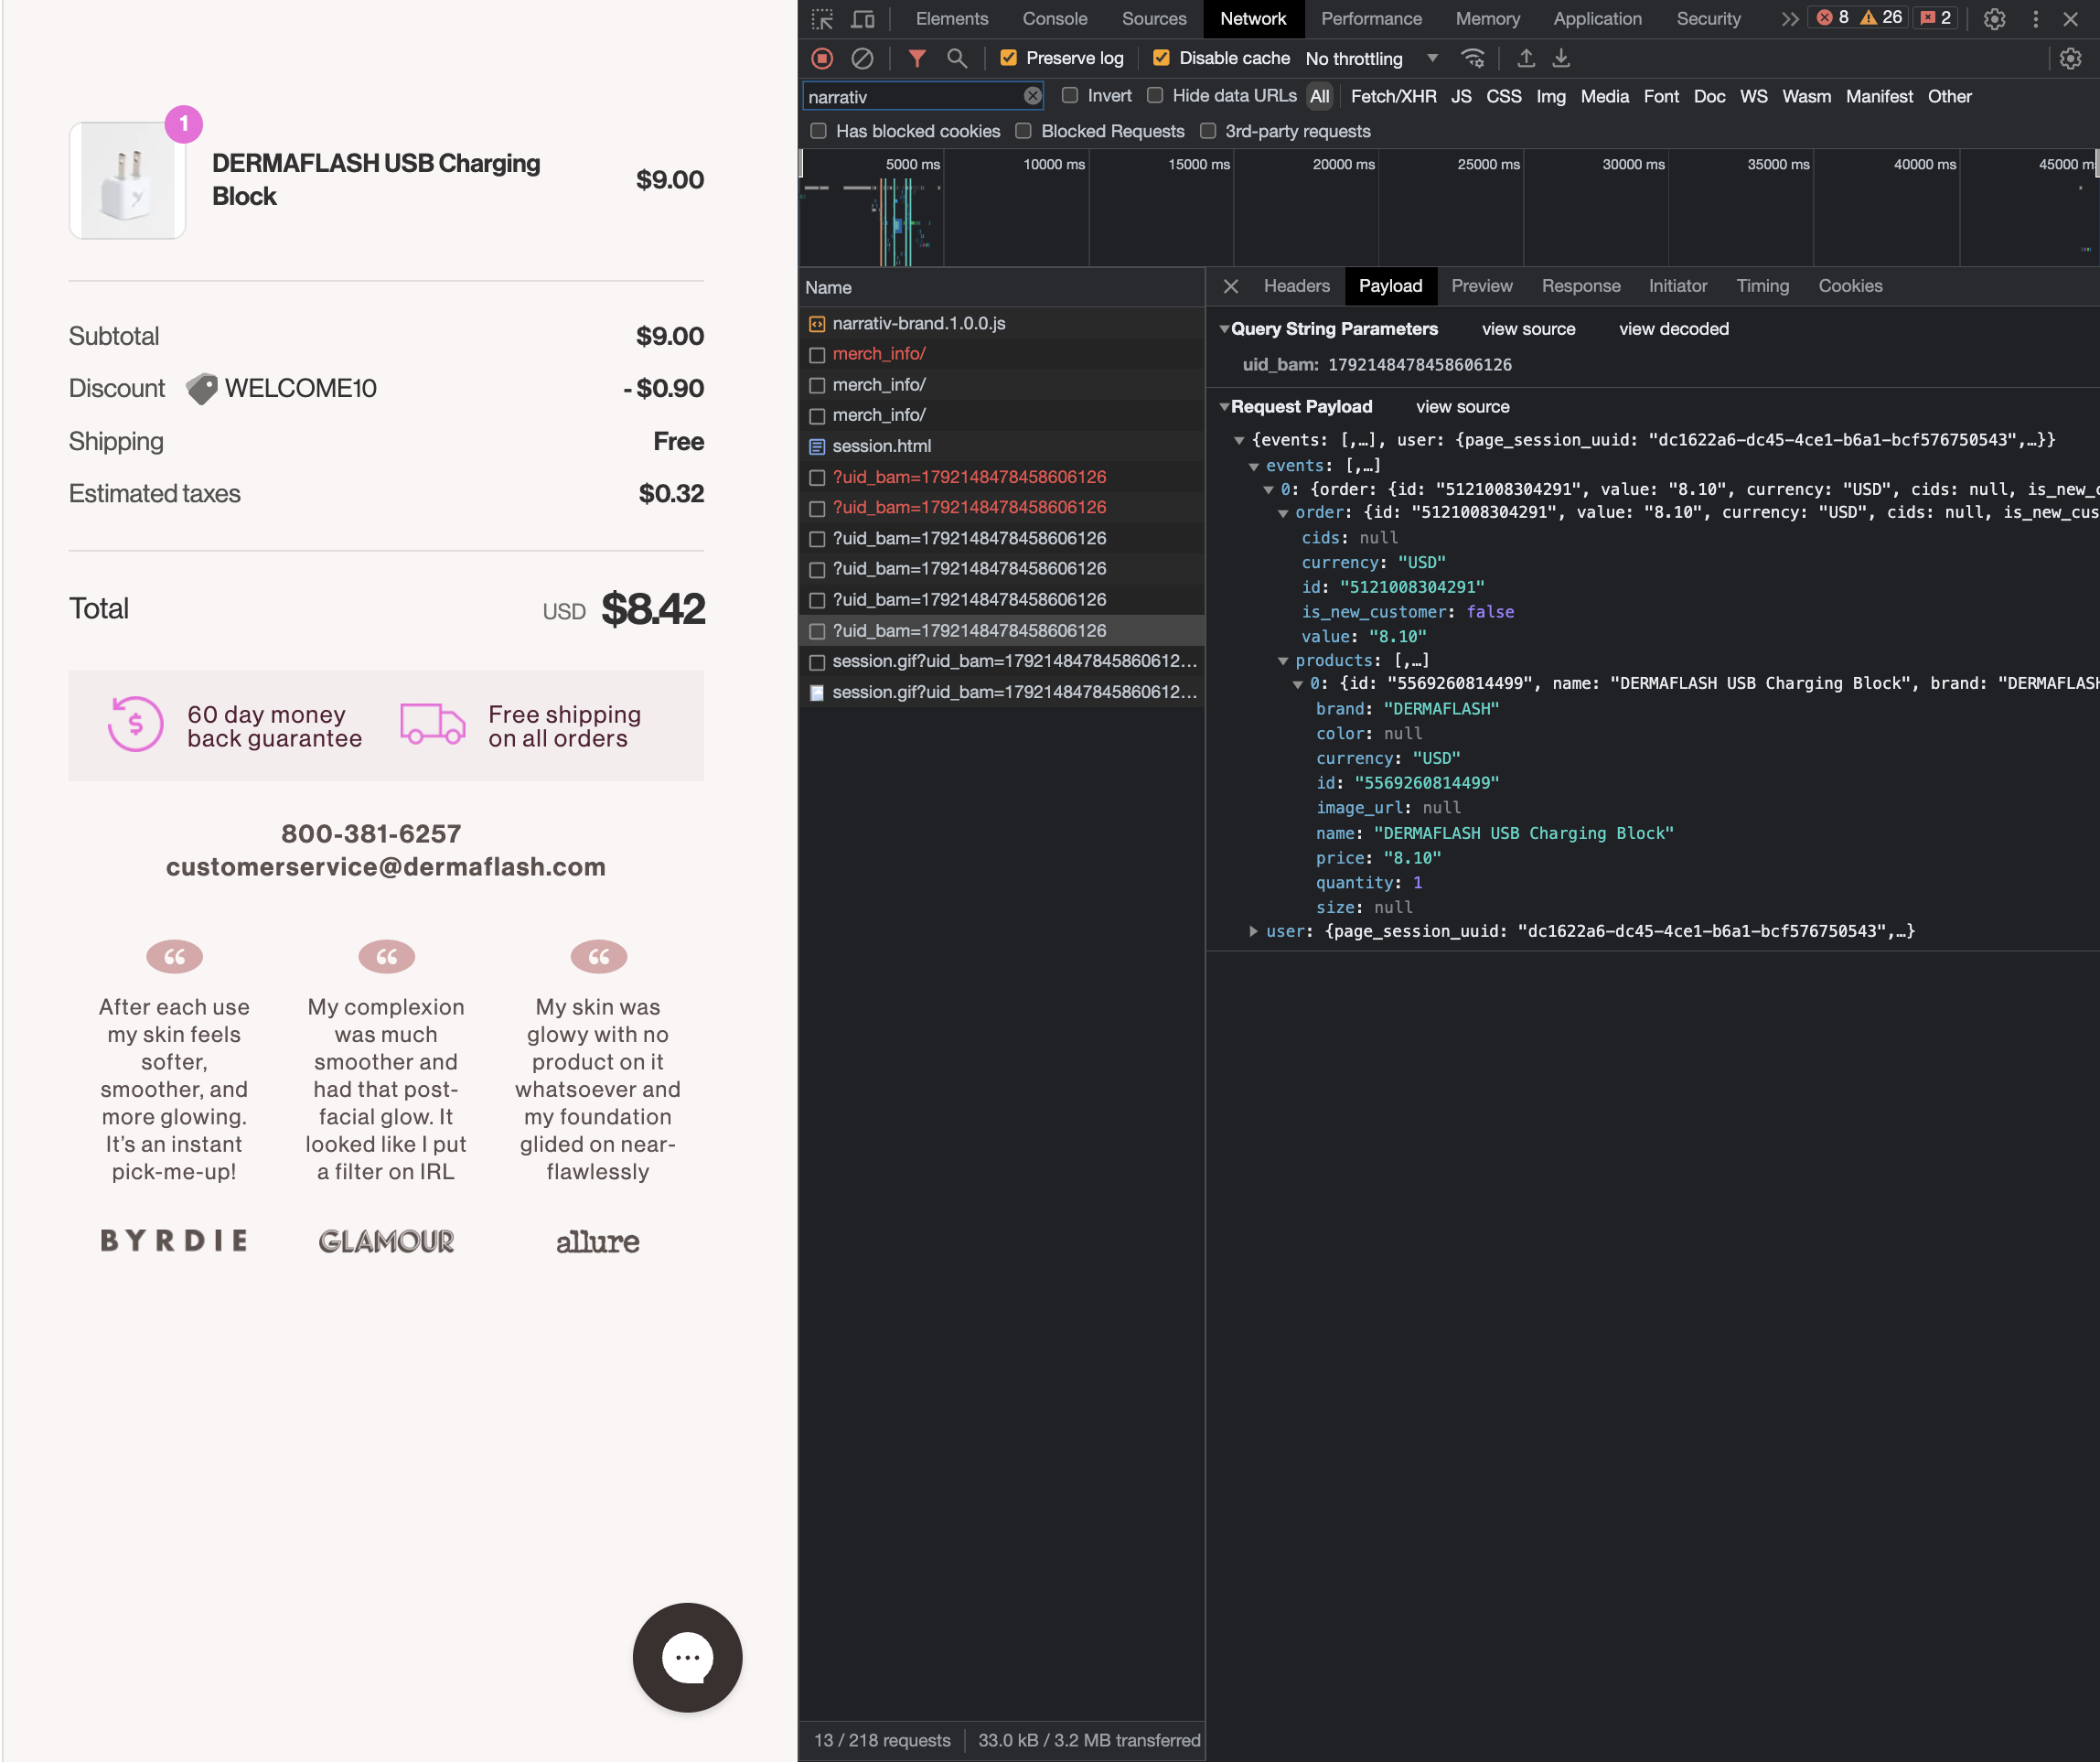
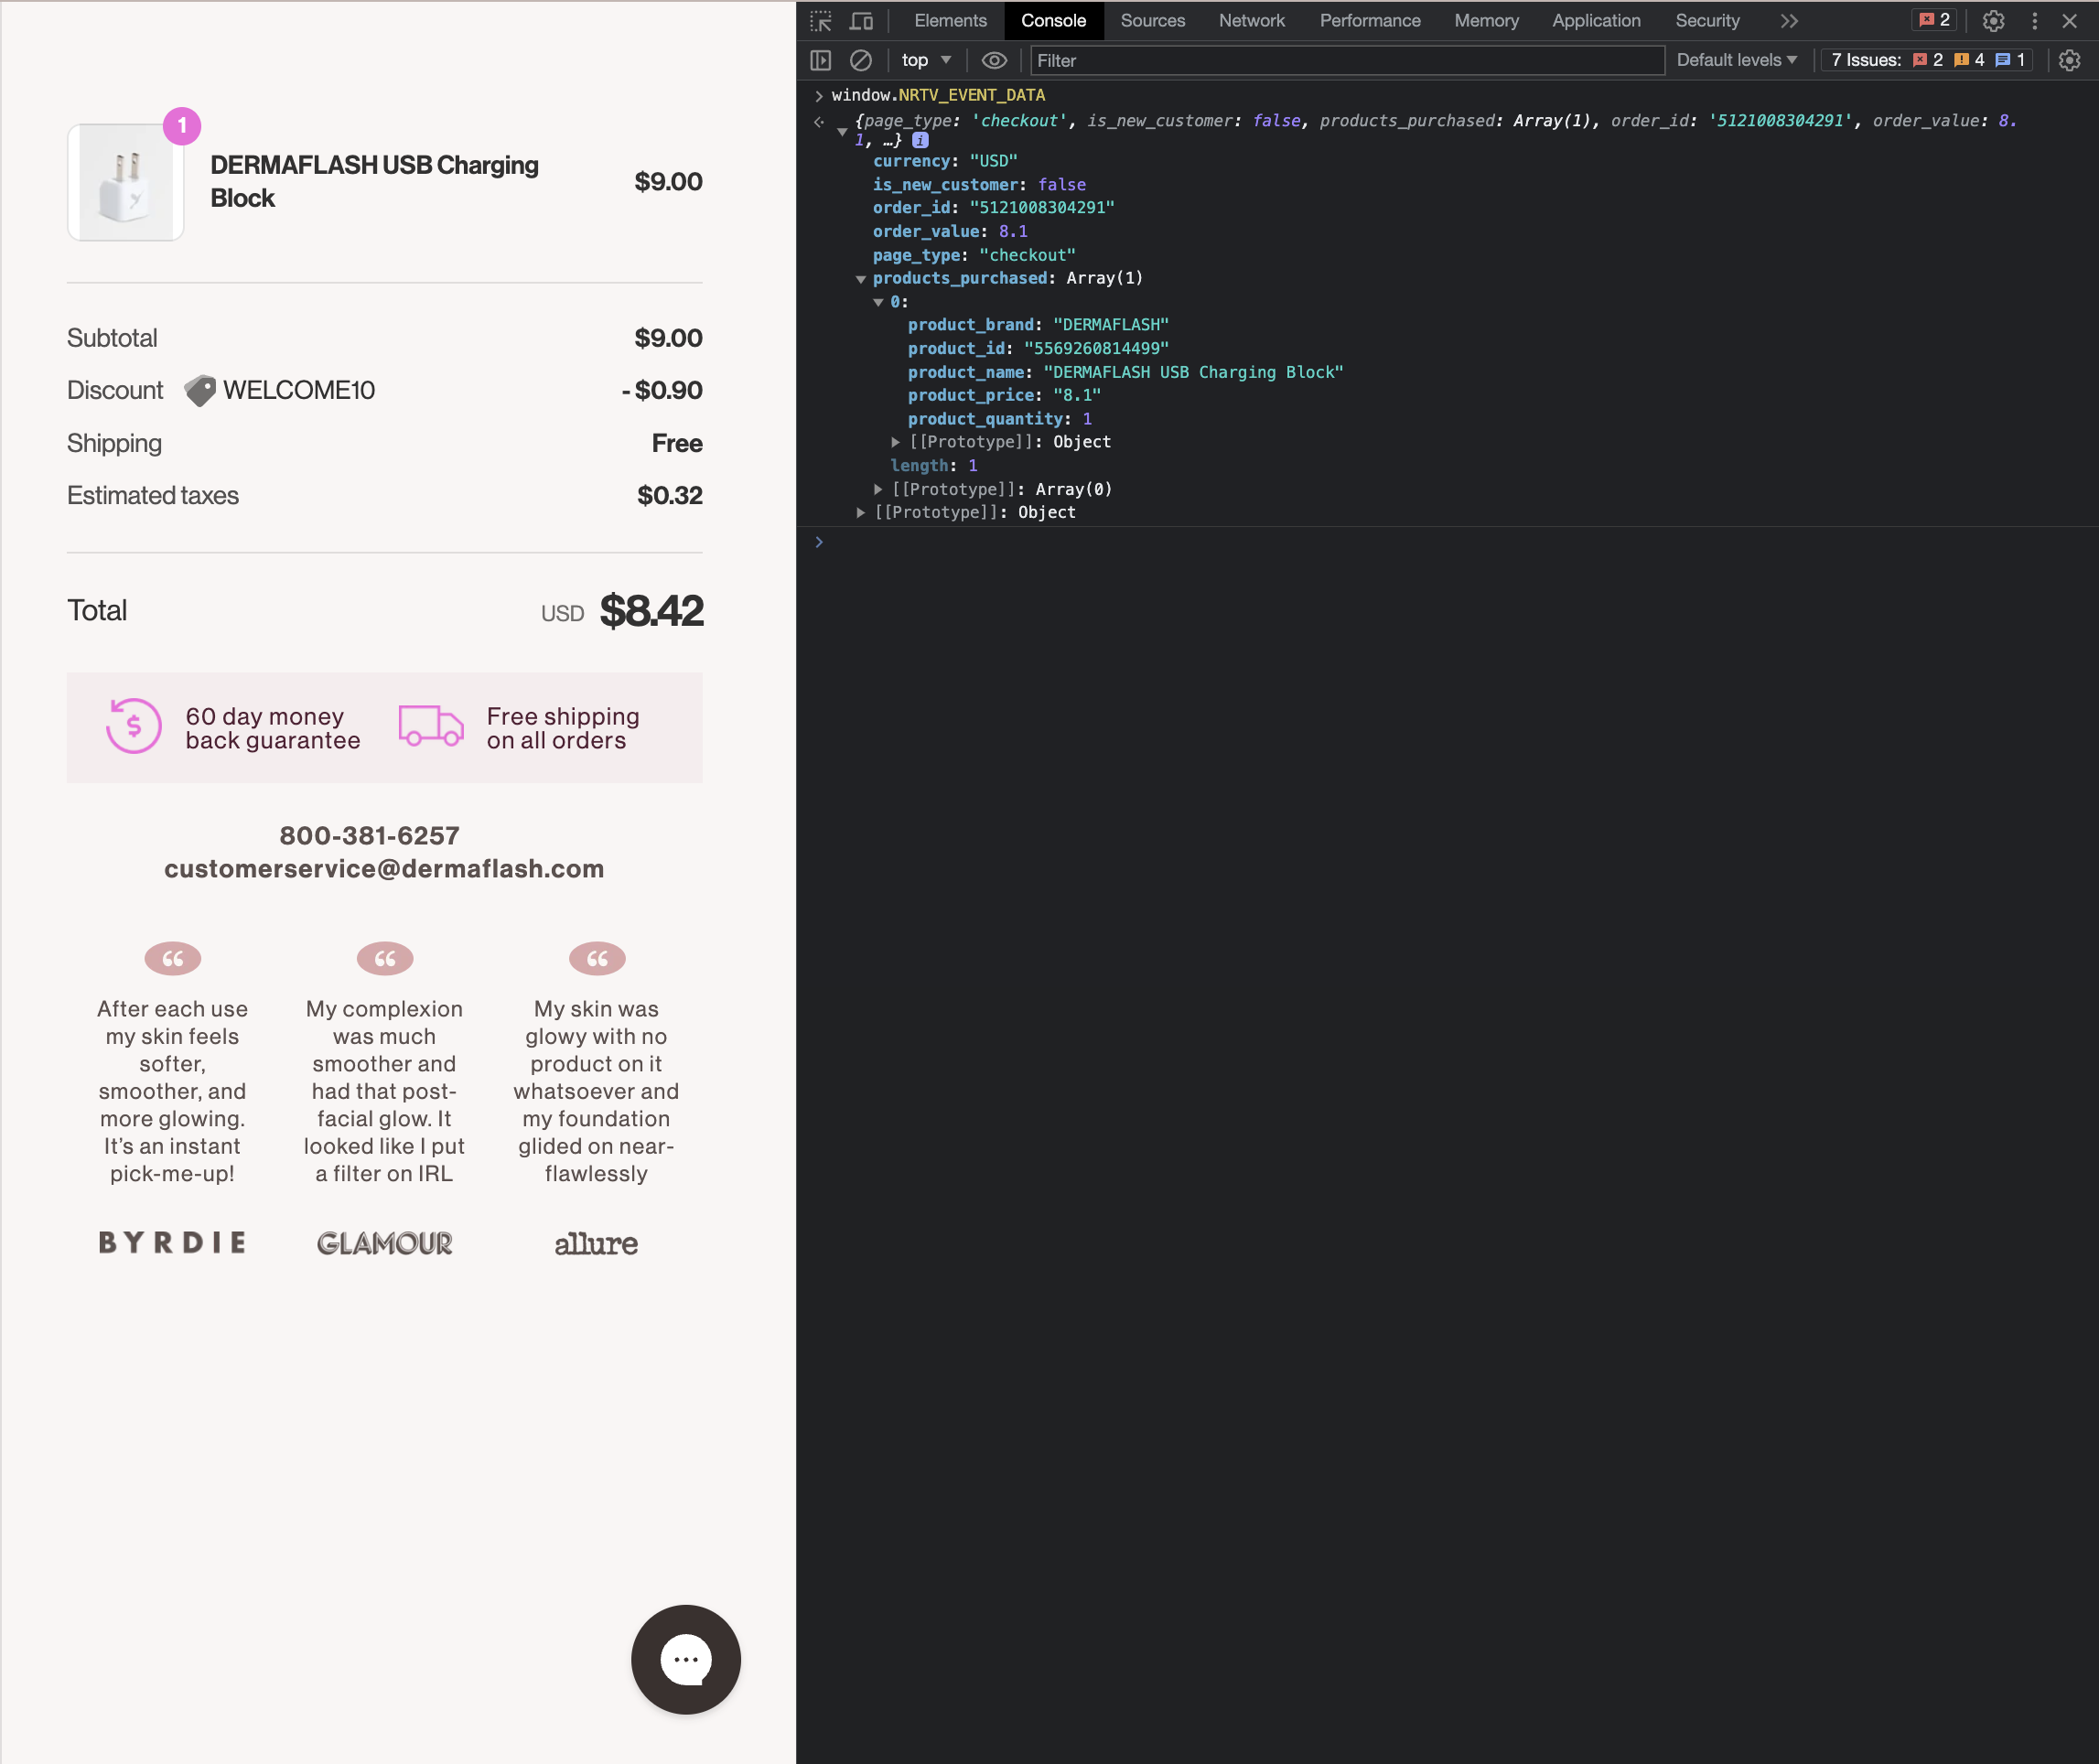
Complete the checkout with a discount code and wait until all redirects have completed. You should be on the order confirmation or order status page.
Open the Chrome Developer Tools on Google Chrome and select the Console tab.
Type window.NRTV_EVENT_DATA in the console and hit the Enter key on your keyboard.
Expand the details.
The list of products should have prices that reflect the discount in the order.
Web Implementation
Page Impression Events
Copy and paste the following Javascript snippet in the HEAD section of all site pages, excluding the checkout path (pages that include PII) and the order confirmation page.
Make sure to replace
ACCOUNT IDwith your own Howl account id.Need your Howl account id? Reach out to your growth manager or solutions@planethowl.com for assistance.
<script type="text/javascript">
    (function (window, document, accountId) {
          var b = document.createElement("script");
          b.type = "text/javascript";
          b.src = "https://static.narrativ.com/tags/narrativ-brand.1.0.0.js";
          b.async = true;
          b.id = 'nrtvTag';
          b.setAttribute('data-narrativ-id', accountId);
          var a = document.getElementsByTagName("script")[0];
          a.parentNode.insertBefore(b, a);
      })(window, document, ACCOUNT ID);
</script>
Checkout Events
Place the following code snippet on your site’s order confirmation page, or the page displayed to customers immediately
after they’ve successfully purchased their items. The code should be populated with order and product purchased details
pertaining to your data layer. Remember to also replace ACCOUNT ID with your own Howl account id.
<script type="text/javascript">
  var purchased = <dataLayerProducts>;
  var productsPurchased = [];
  var orderTotal = 0;
  for (var i = 0; i < purchased.length; i++) {
    let finalPrice = parseFloat(purchased[i].<ItemPrice>);

    <!-- Only do this if the product price does not include the discount. -->
    if (purchased[i].<Discount>) {
      finalPrice -= parseFloat(purchased[i].<Discount>)
    }

    productsPurchased.push({
      product_id: purchased[i].<ItemID>,
      product_name: purchased[i].<ItemName>,
      product_brand: purchased[i].<ItemBrand>,
      product_size: purchased[i].<ItemSize>,
      product_color: purchased[i].<ItemColor>,
      product_price: finalPrice.toString(),
      product_quantity: purchased[i].<ItemQuantity>
    });
    orderTotal += (finalPrice * purchased[i].<ItemQuantity>);
  }

  window.NRTV_EVENT_DATA = {
      page_type: 'checkout',
      is_new_customer: <isNewCustomer>,
      products_purchased: productsPurchased,
      order_id: <OrderID>,
      order_value: orderTotal,
      currency: <CurrencyCode>
  };

  (function (window, document, accountId) {
      var b = document.createElement("script");
      b.type = "text/javascript";
      b.src = "https://static.narrativ.com/tags/narrativ-brand.1.0.0.js";
      b.async = true;
      b.id = 'nrtvTag';
      b.setAttribute('data-narrativ-id', accountId);
      var a = document.getElementsByTagName("script")[0];
      a.parentNode.insertBefore(b, a);
  })(window, document, ACCOUNT ID);
</script>
Discount Code Logic
To ensure the tag captures discount codes, include logic that checks for the presence of a discount
code and applies it proportionally to the product_price variable. Discount codes do not need to be applied to
the order_value variable.
Customize the Checkout Code to Your Site
Populate the code snippet based on below requirements:
Statement |
Requirement |
Data Type |
Notes |
|---|---|---|---|
|
Replace |
Object |
|
|
Replace |
String |
|
|
Replace |
String |
|
|
Replace |
String |
Both cart level and product level coupon codes should be captured in this variable (e.g. if a coupon code
variable in the data layer is not null, apply X% discount to |
|
Replace |
Integer |
|
|
Replace |
String |
If Item Brand is not available, replace |
|
Replace |
String |
If Item Size is not available, replace |
|
Replace |
String |
If Item Color is not available, replace |
|
Replace |
String |
|
|
Replace |
Boolean |
If field is not available, replace |
|
Replace |
String |
|
|
Replace |
String |
Shopify Implementation
You may reference the following examples for implementing the tag on your Shopify site, but you may also roll your own implementation as long as it meets the requirements.
Page Impression Events
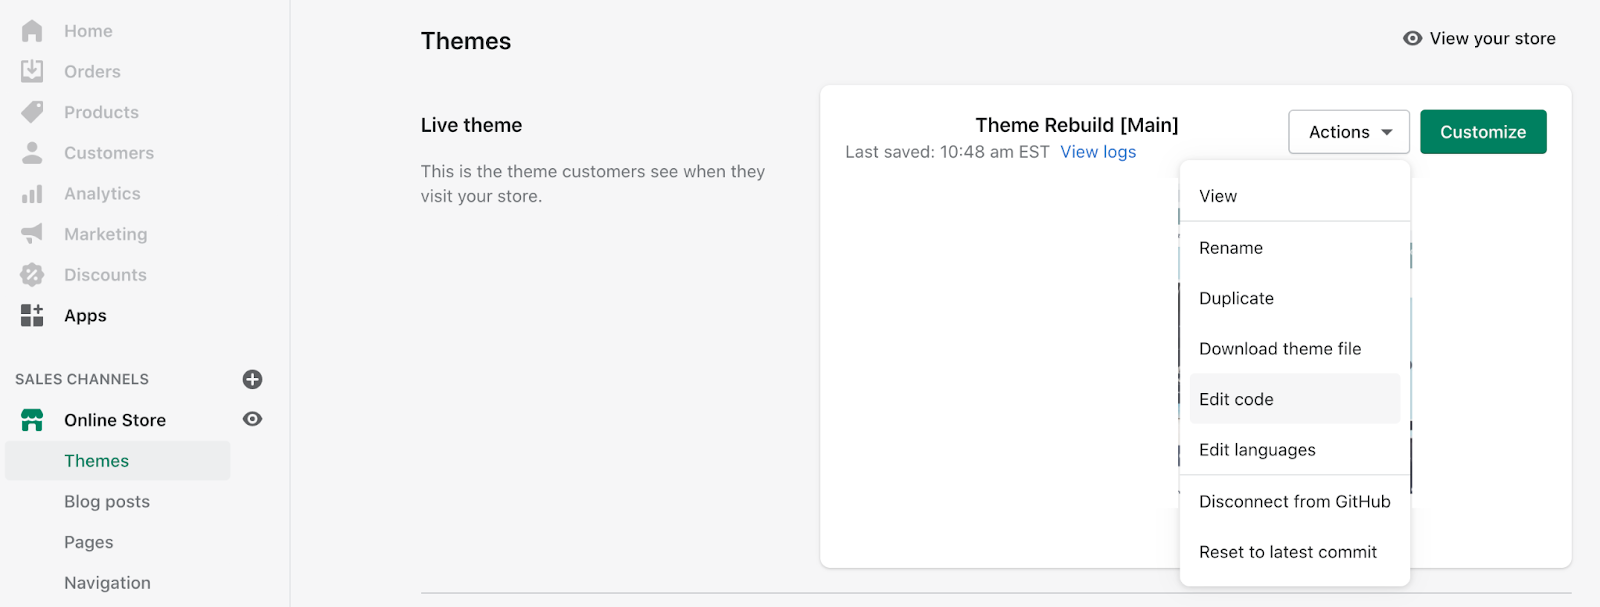
On your Shopify home page, navigate to the Edit code option in the Themes section:
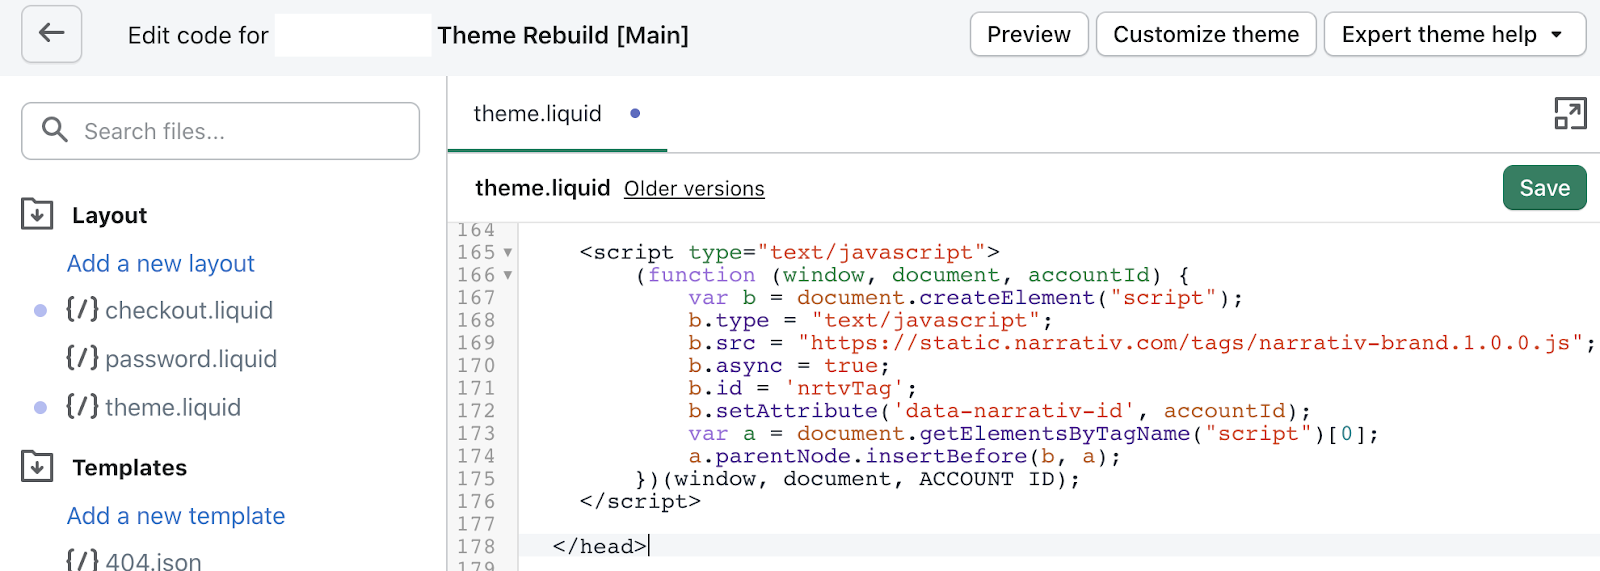
Copy and paste the following Javascript snippet into the <head> tag of the theme.liquid layout (pictured below
the snippet) and save your changes.
Make sure to replace
ACCOUNT IDwith your own Howl account id.Need your Howl account id? Reach out to your growth manager or solutions@planethowl.com for assistance.
  <script type="text/javascript">
      (function (window, document, accountId) {
          var b = document.createElement("script");
          b.type = "text/javascript";
          b.src = "https://static.narrativ.com/tags/narrativ-brand.1.0.0.js";
          b.async = true;
          b.id = 'nrtvTag';
          b.setAttribute('data-narrativ-id', accountId);
          var a = document.getElementsByTagName("script")[0];
          a.parentNode.insertBefore(b, a);
      })(window, document, ACCOUNT ID);
</script>
Checkout Events
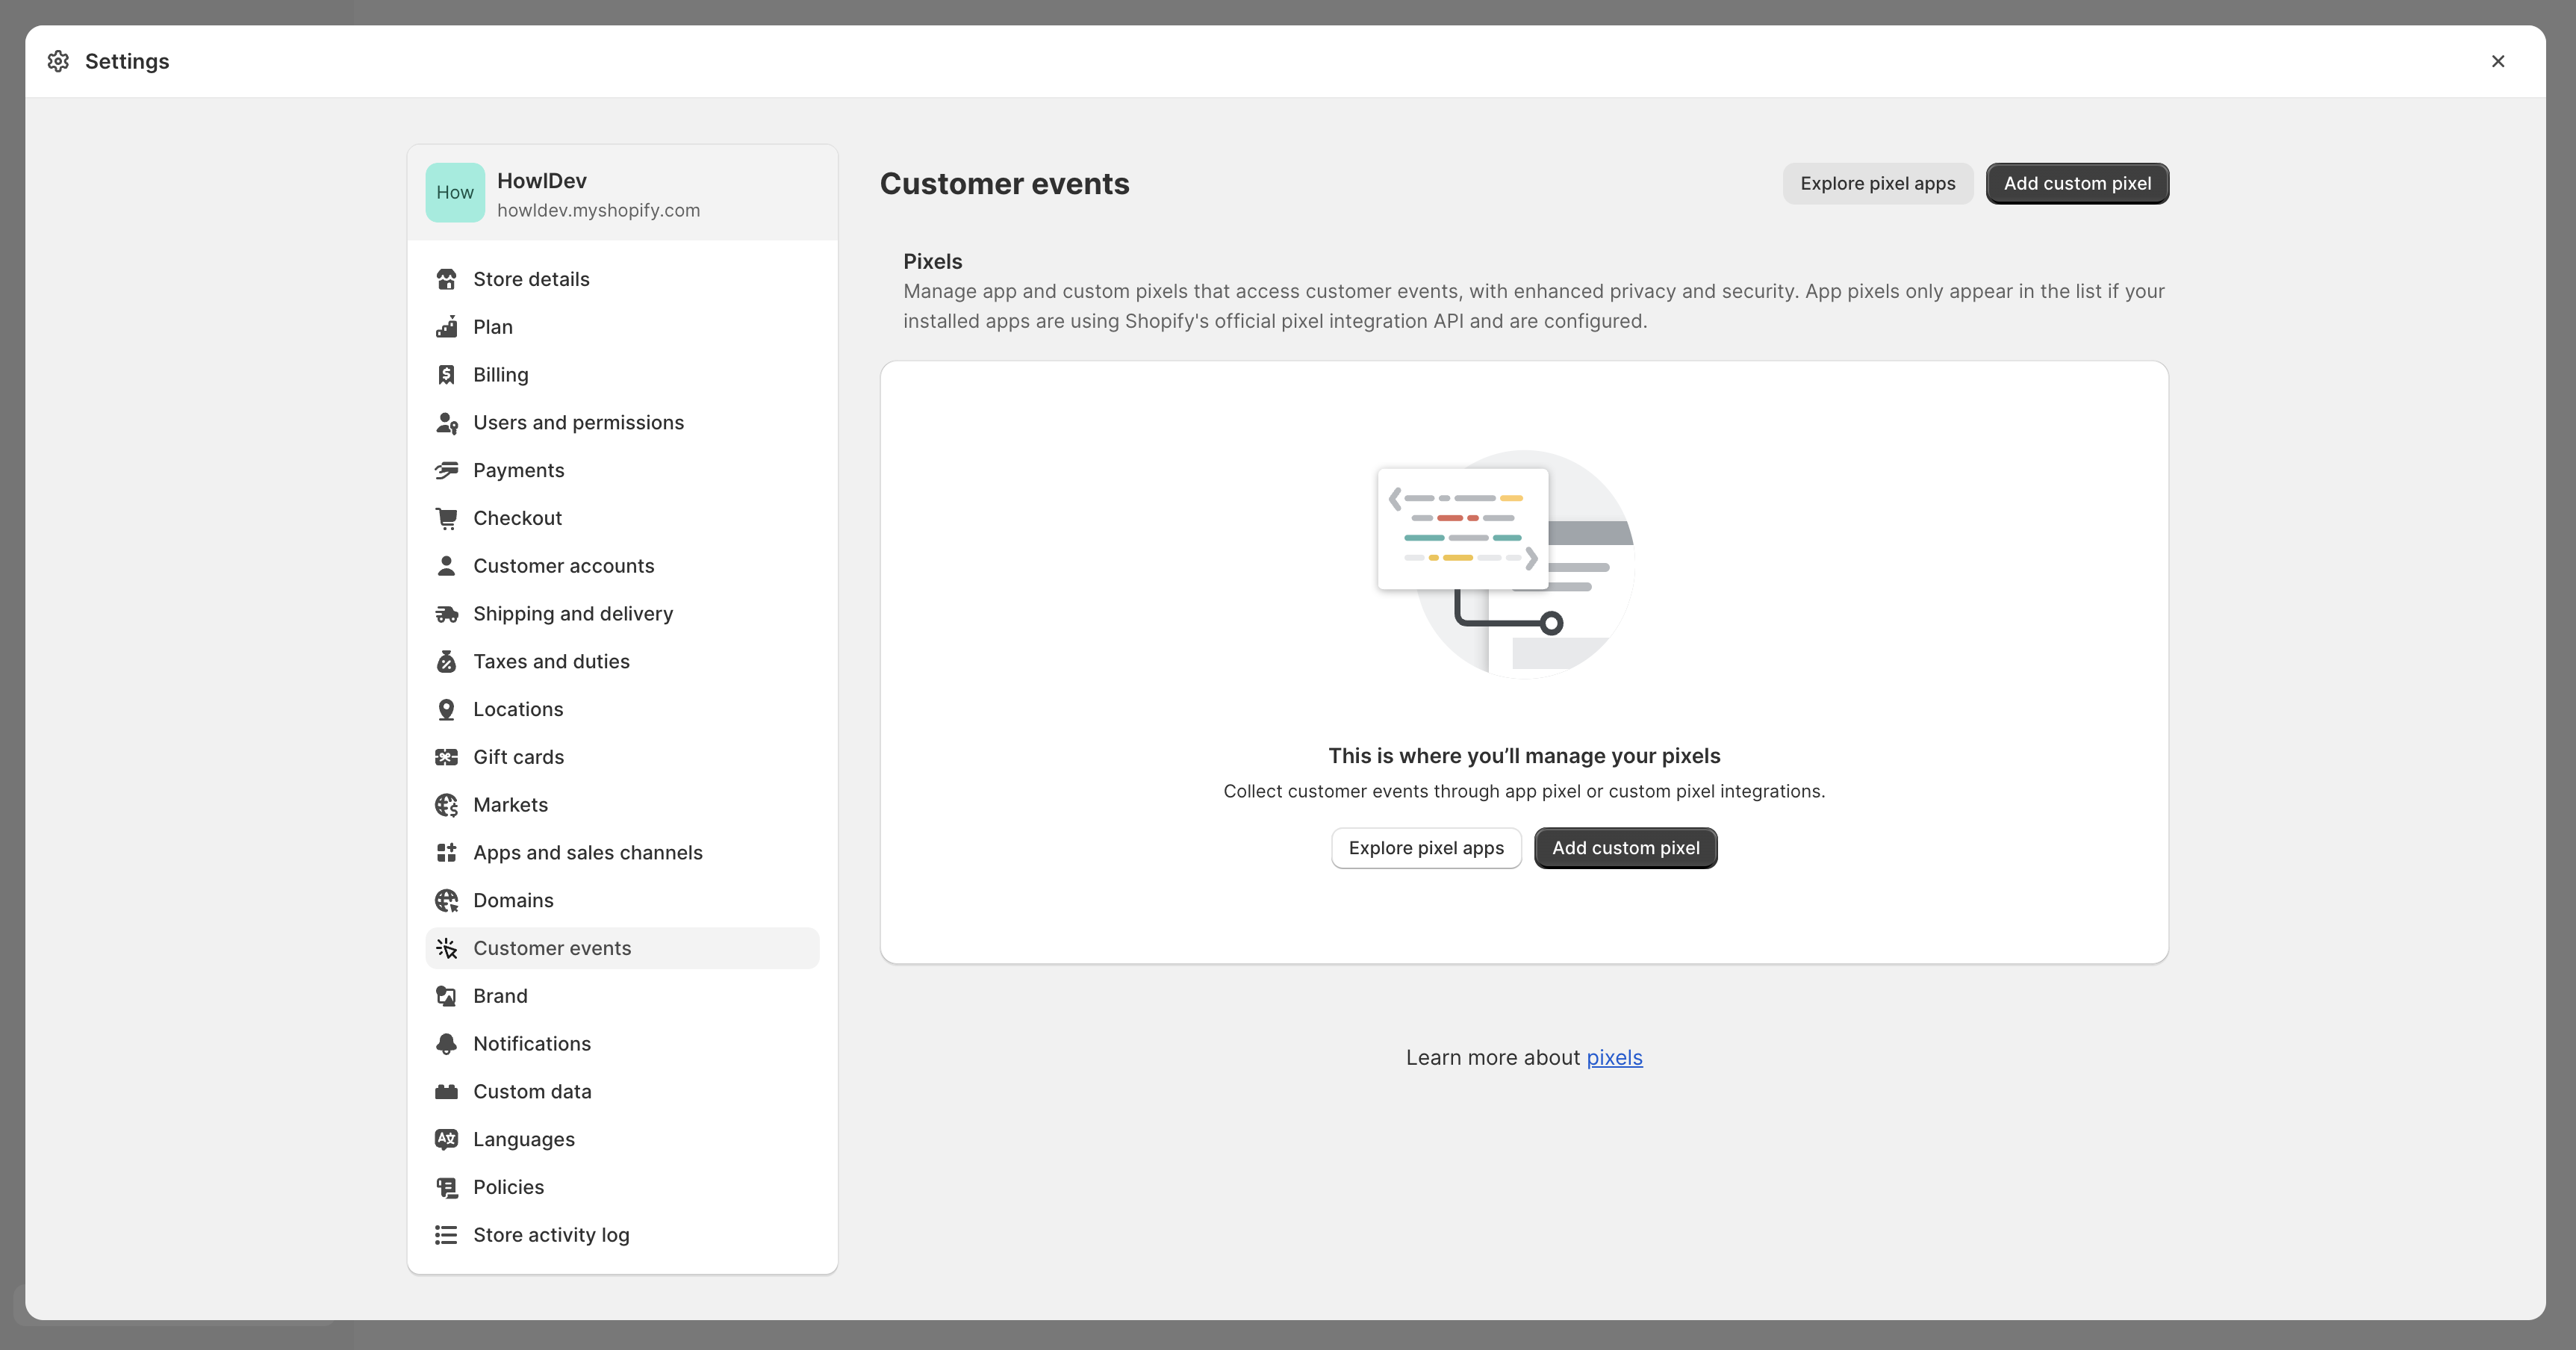
In order to integrate the checkout tag within Shopify, Shopify recommends using pixel apps or custom pixels found in the Customer events settings.
Click the Settings button on the bottom left of the navigation bar on the Shopify store home page.
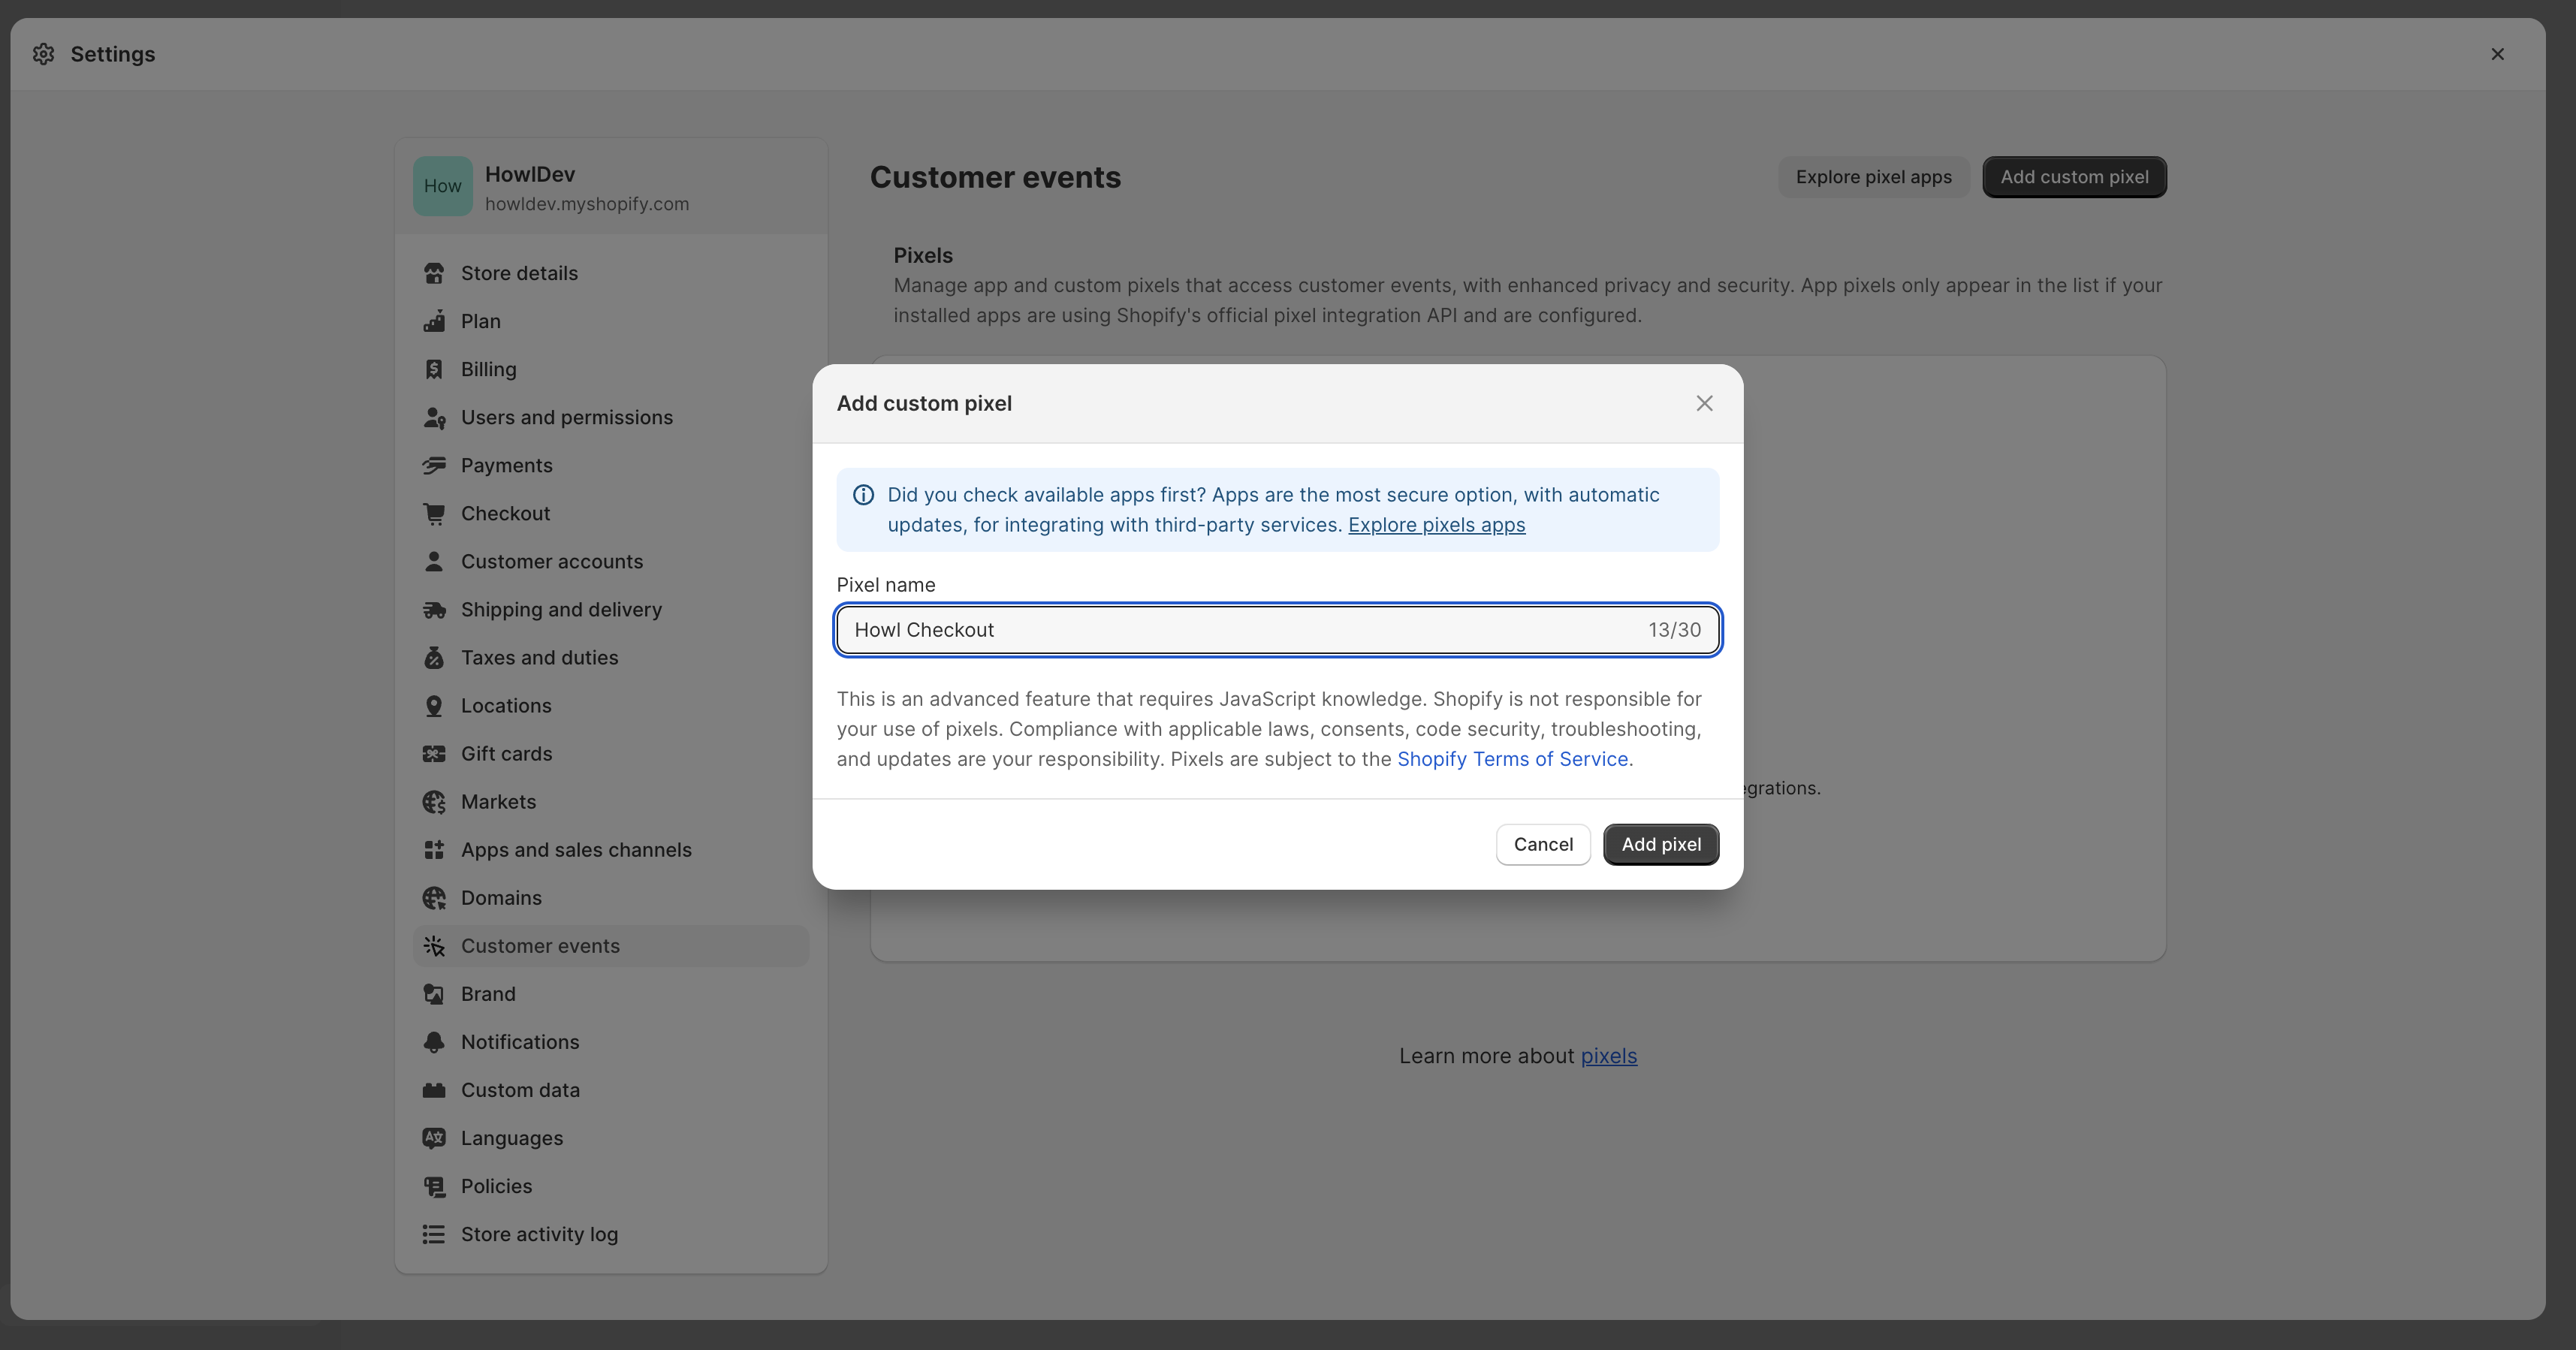
Once the setting modal is visible, click on Customer events and then click Add custom pixel.
Name the pixel “Howl Checkout” and click Add pixel.
Add the following snippet to the Code section of the custom pixel. Replace ACCOUNT_ID with your Howl account id.
// Step 1. Add and initialize your third-party JavaScript pixel (make sure to exclude HTML)
function checkoutPixel(eventData) {
  var checkoutData = eventData.checkout;
  var purchased = checkoutData.lineItems;
  var productsPurchased = [];
  var orderTotal = 0;

  for (var i = 0; i < purchased.length; i++) {
    var productPrice = purchased[i].variant.price.amount;
    if (purchased[i].discountAllocations.length) {
      for (var j = 0; j < purchased[i].discountAllocations.length; j++) {
        productPrice -= parseFloat(purchased[i].discountAllocations[j].amount.amount);
      }
    }
    productsPurchased.push({
      product_id: purchased[i].variant.product.id,
      product_name: purchased[i].variant.product.title,
      product_brand: purchased[i].variant.product.vendor,
      product_price: parseFloat(productPrice).toFixed(2),
      product_quantity: purchased[i].quantity
    });
    orderTotal += parseFloat(productPrice) * purchased[i].quantity;
  }

  window.NRTV_EVENT_DATA = {
    page_type: 'checkout',
    is_new_customer: null,
    products_purchased: productsPurchased,
    order_id: checkoutData.order.id,
    order_value: parseFloat(orderTotal).toFixed(2),
    currency: checkoutData.currencyCode,
  };

  try {
    var b = document.createElement("script");
    b.type = "text/javascript";
    b.src = "https://static.narrativ.com/tags/narrativ-brand.1.0.0.js";
    b.async = true;
    b.id = 'nrtvTag';
    b.setAttribute('data-narrativ-id', ACCOUNT_ID);
    var a = document.getElementsByTagName("script")[0];
    a.parentNode.insertBefore(b, a);
  } catch (e) {
    console.log('Howl Checkout Pixel Error: ', e)
  }
}


// Step 2. Subscribe to customer events using the analytics.subscribe() API
 analytics.subscribe("checkout_completed", event => {
   checkoutPixel(event.data);
 });
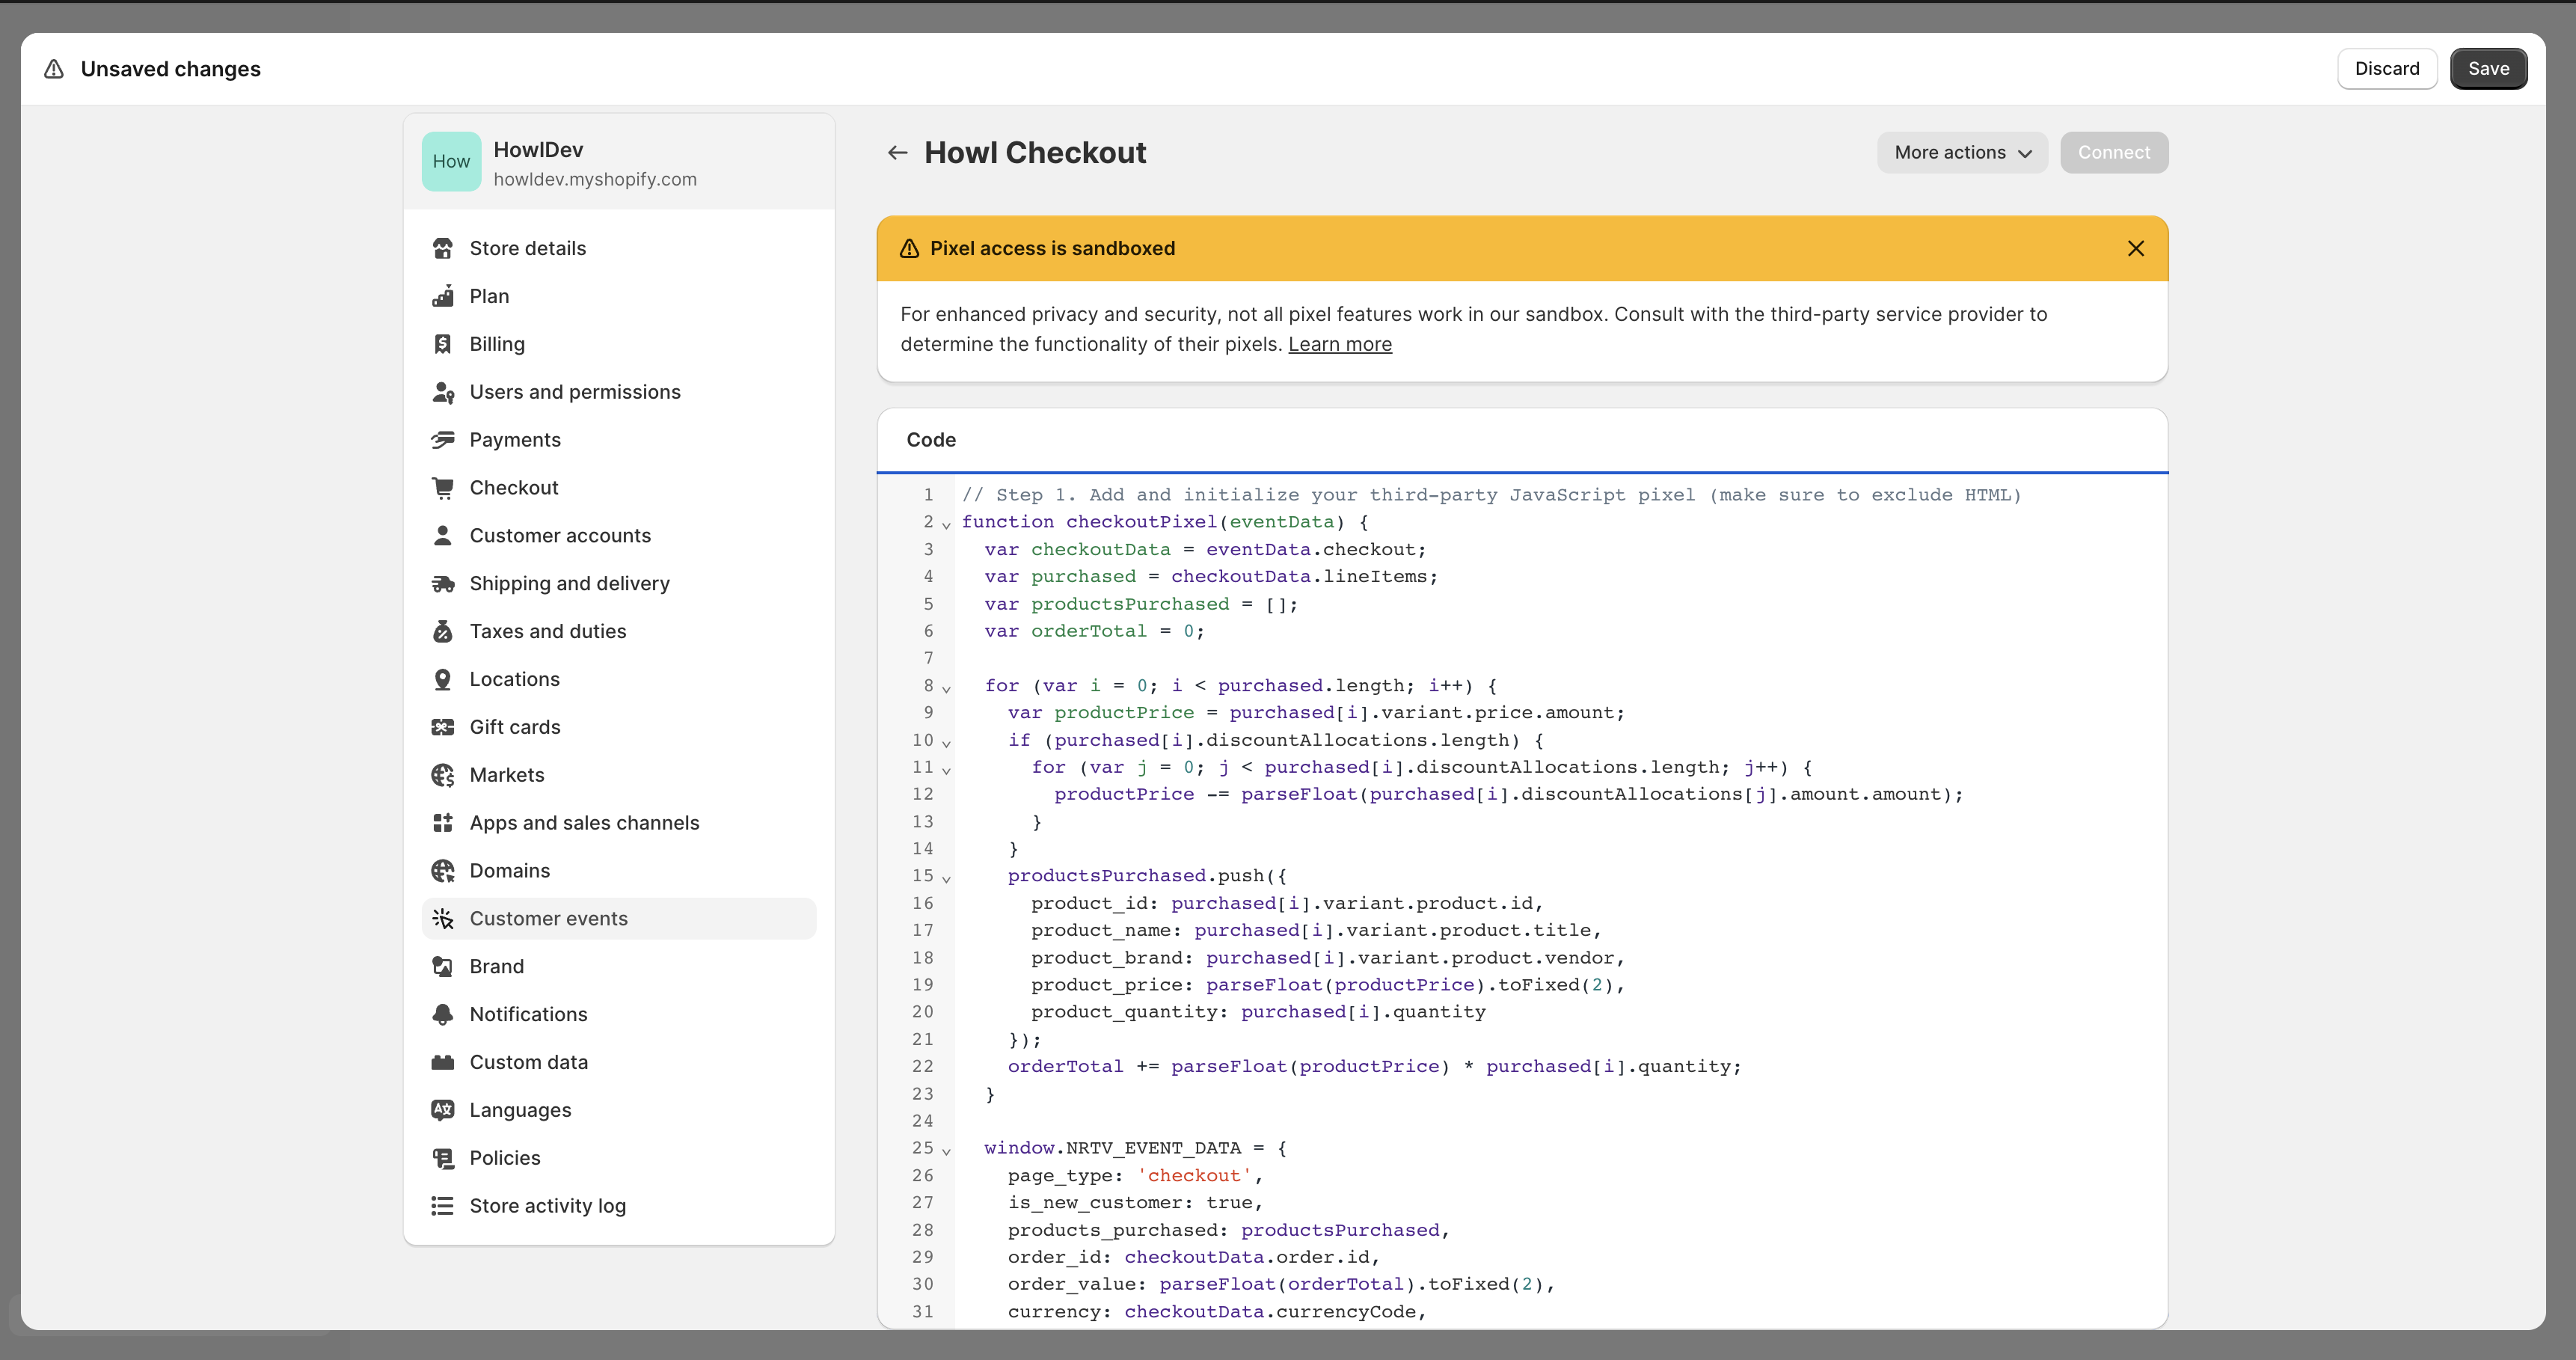
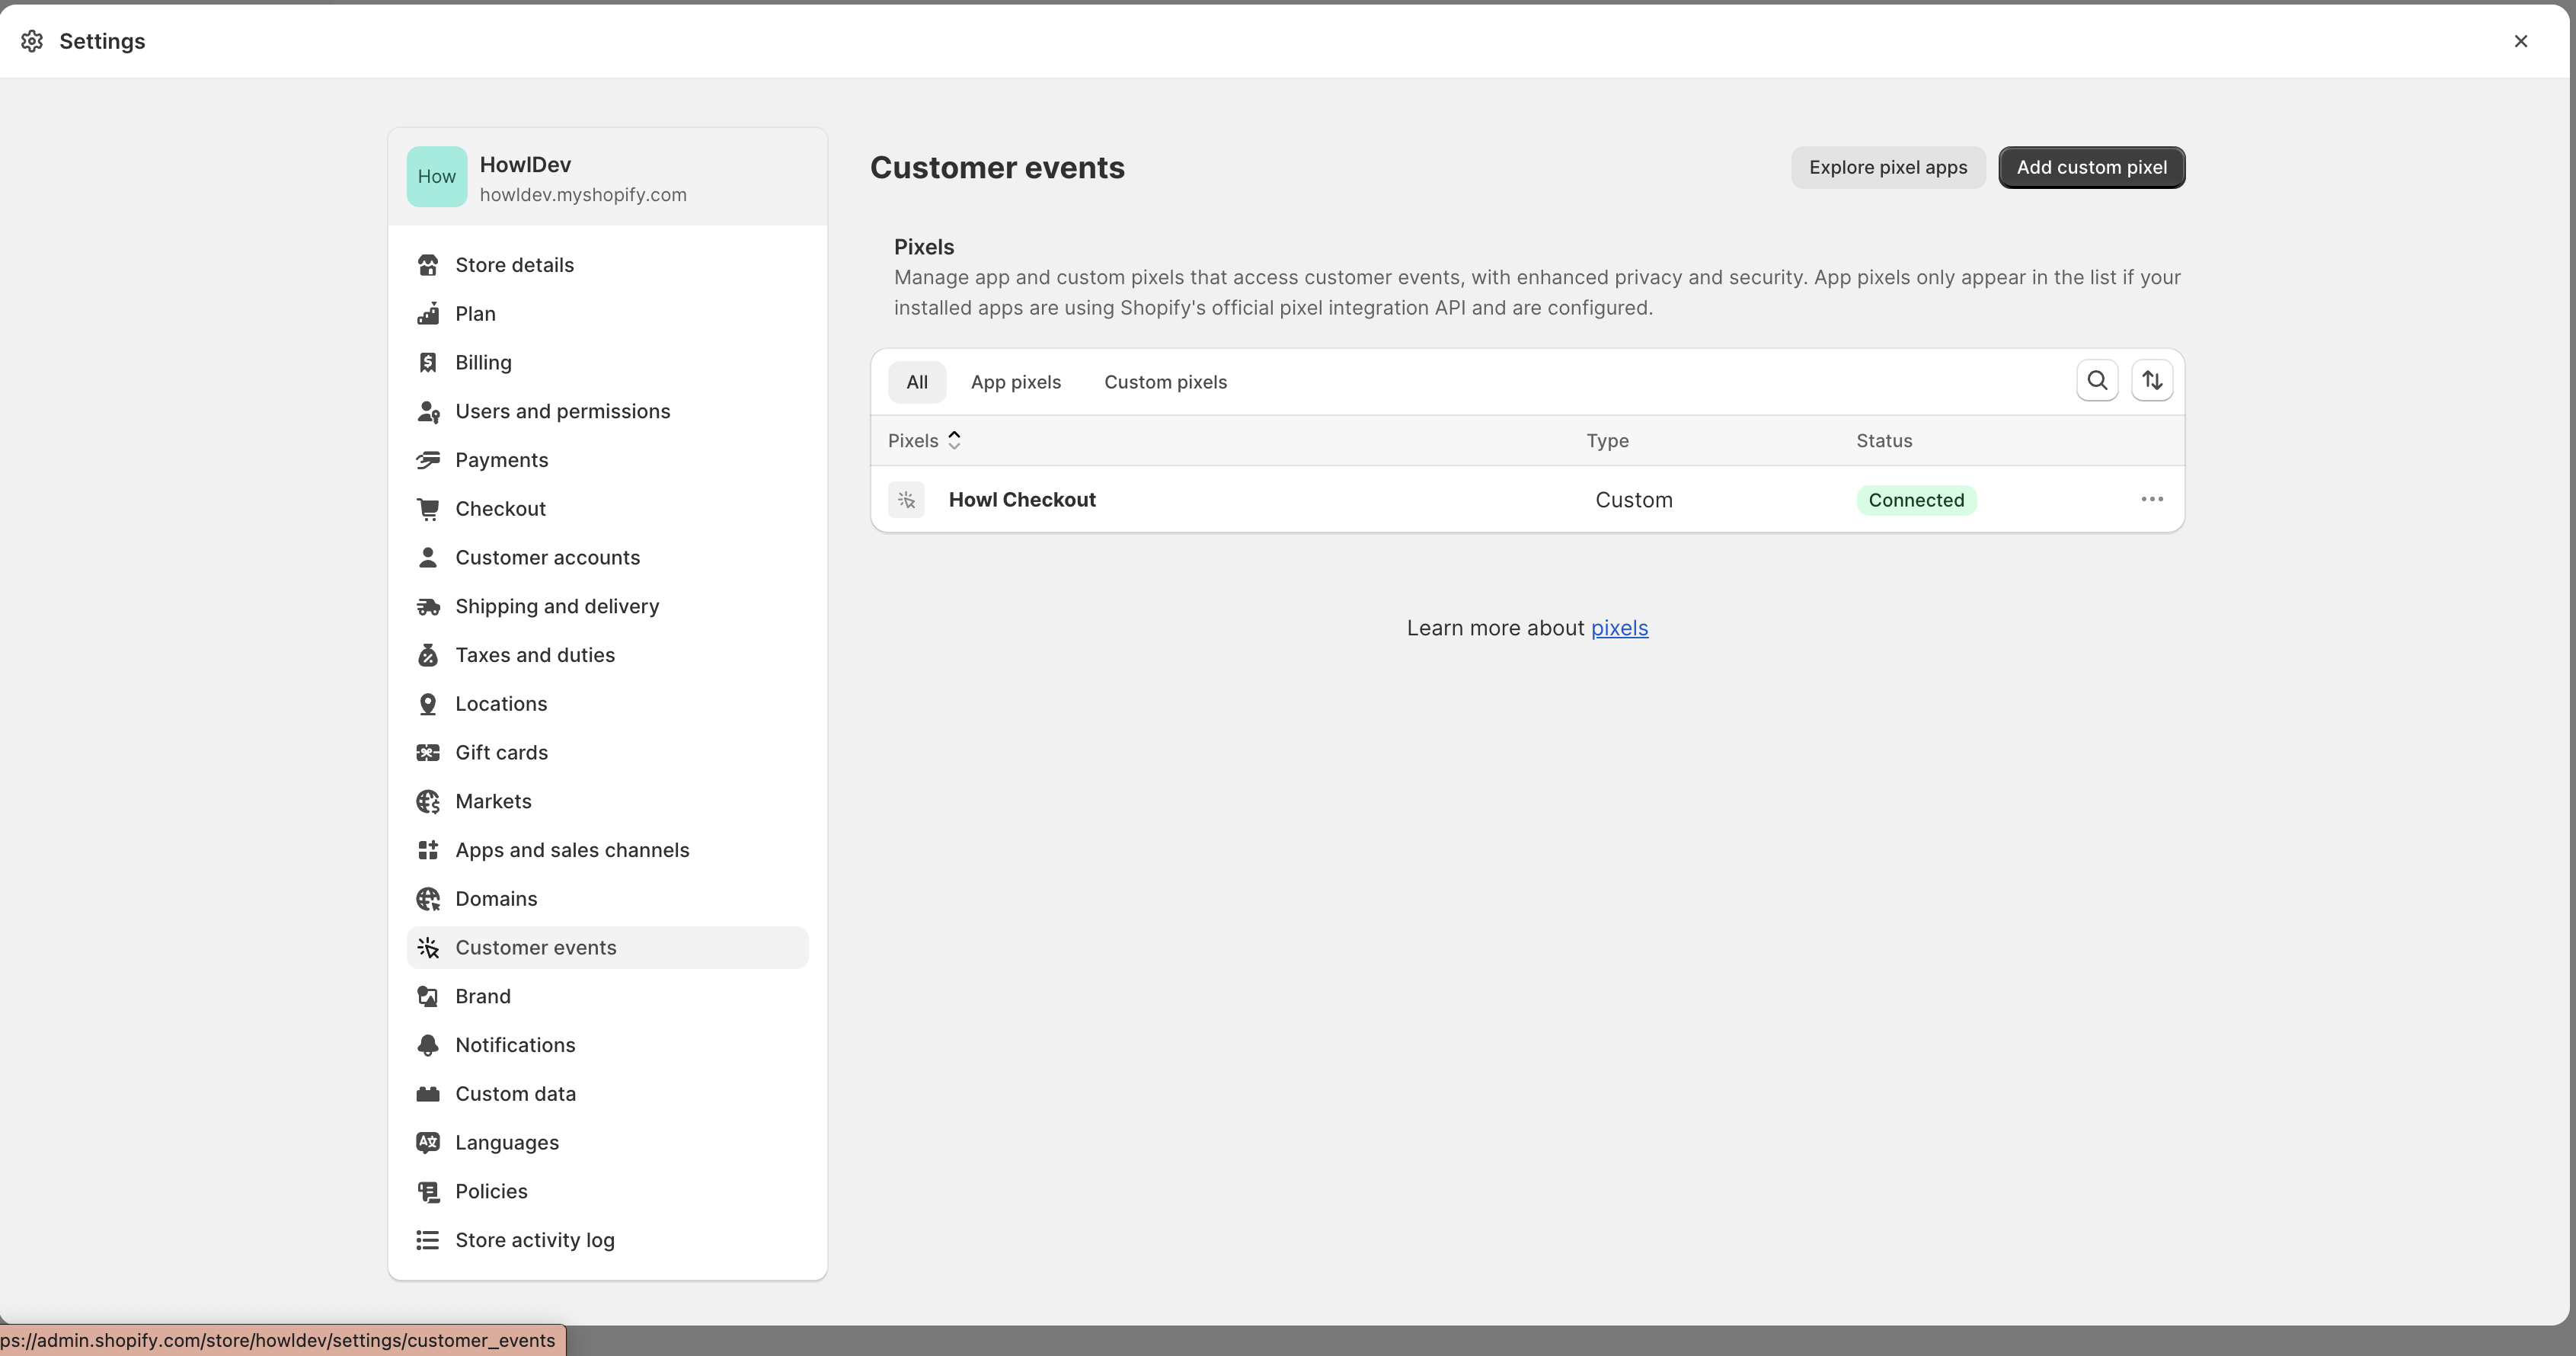
Once the code is added, click Save on the top right, then click Connect. The page should look like this once completed.
Discount Code Logic
To ensure the tag captures discount codes, include logic that checks for the presence of a discount
code and applies it proportionally to the product_price variable. Discount codes do not need to be applied to
the order_value variable.
Google Tag Manager Implementation
Page Impression Events
Create a new tag titled Howl Impression Events with a Custom HTML configuration:

Copy and paste the following Javascript snippet in the HTML field (pictured below the snippet).
Make sure to replace
ACCOUNT IDwith your own Howl account id.Need your Howl account id? Reach out to your growth manager or solutions@planethowl.com for assistance.
<script type="text/javascript">
    (function (window, document, accountId) {
          var b = document.createElement("script");
          b.type = "text/javascript";
          b.src = "https://static.narrativ.com/tags/narrativ-brand.1.0.0.js";
          b.async = true;
          b.id = 'nrtvTag';
          b.setAttribute('data-narrativ-id', accountId);
          var a = document.getElementsByTagName("script")[0];
          a.parentNode.insertBefore(b, a);
      })(window, document, ACCOUNT ID);
</script>
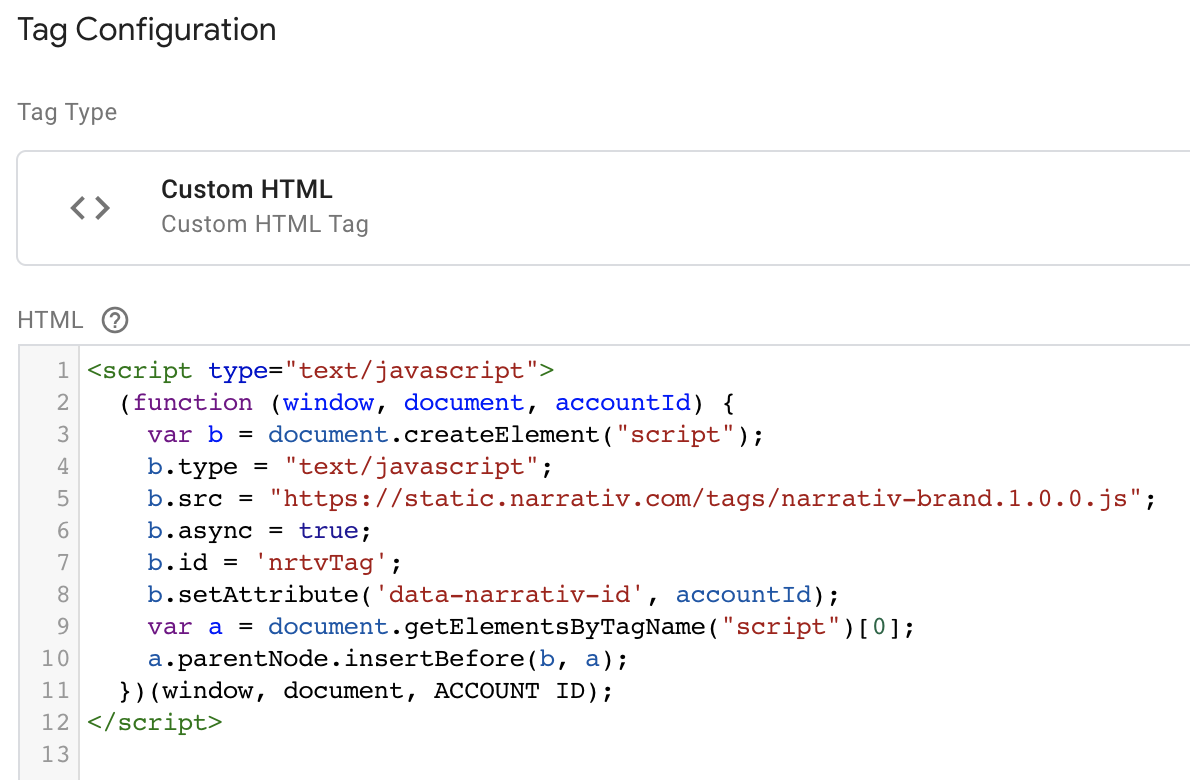
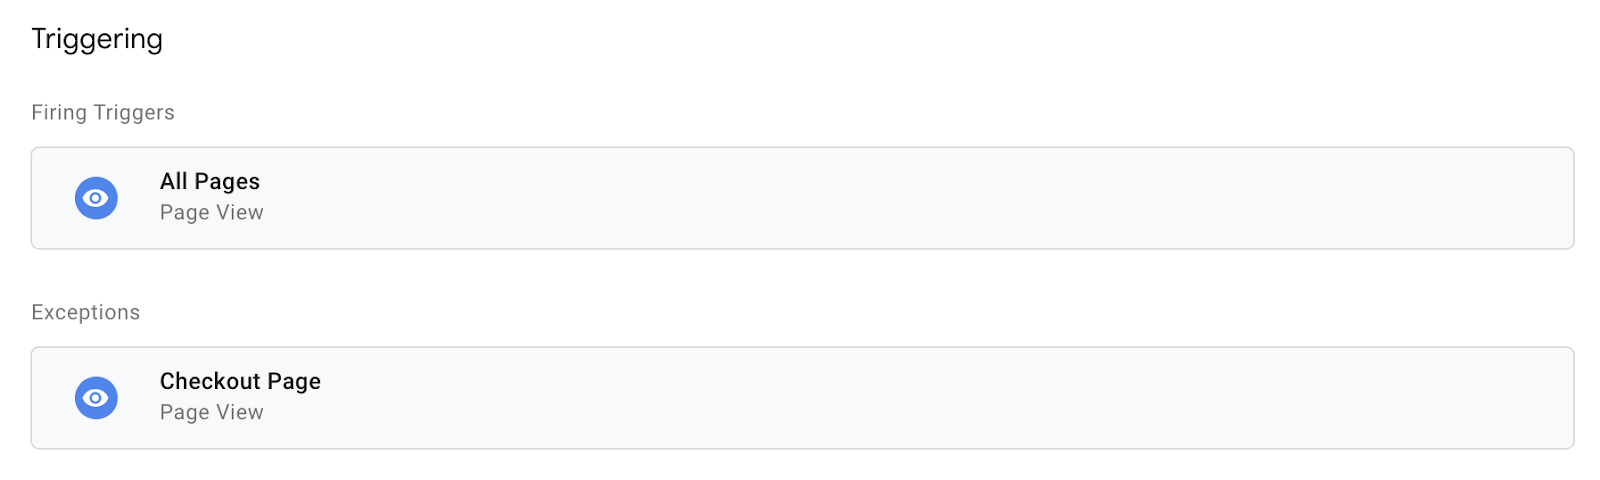
Select “All Pages” as the correct trigger for these events, with an exception added for the “Checkout Page”, and save your changes.
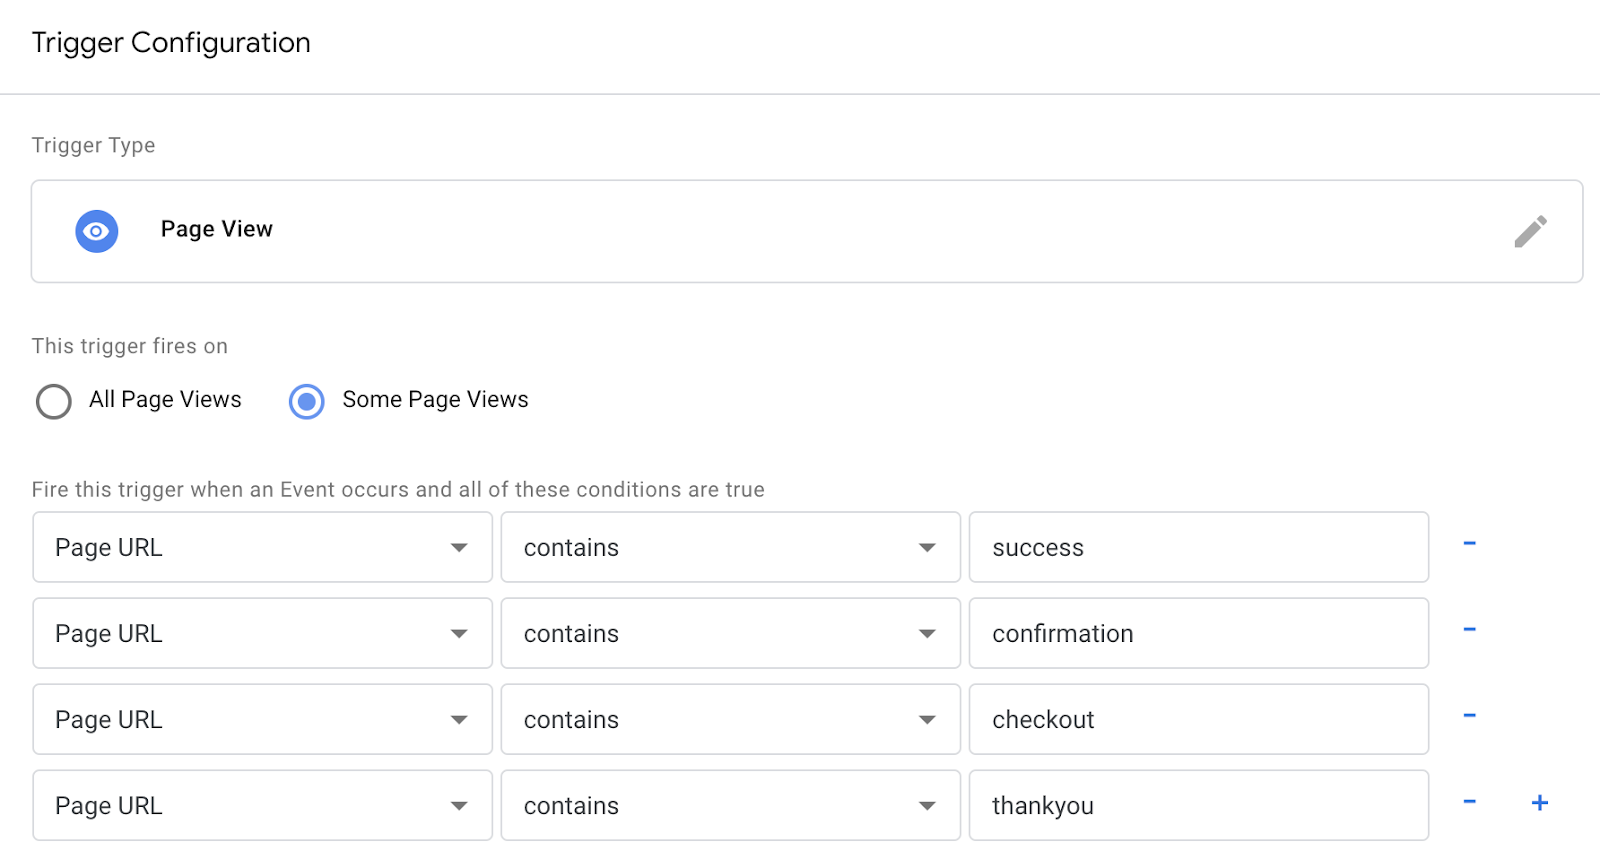
If you don’t already have a trigger for checkout pages, create a new trigger with the settings that pertain to your site (potential options pictured below).
Checkout Events
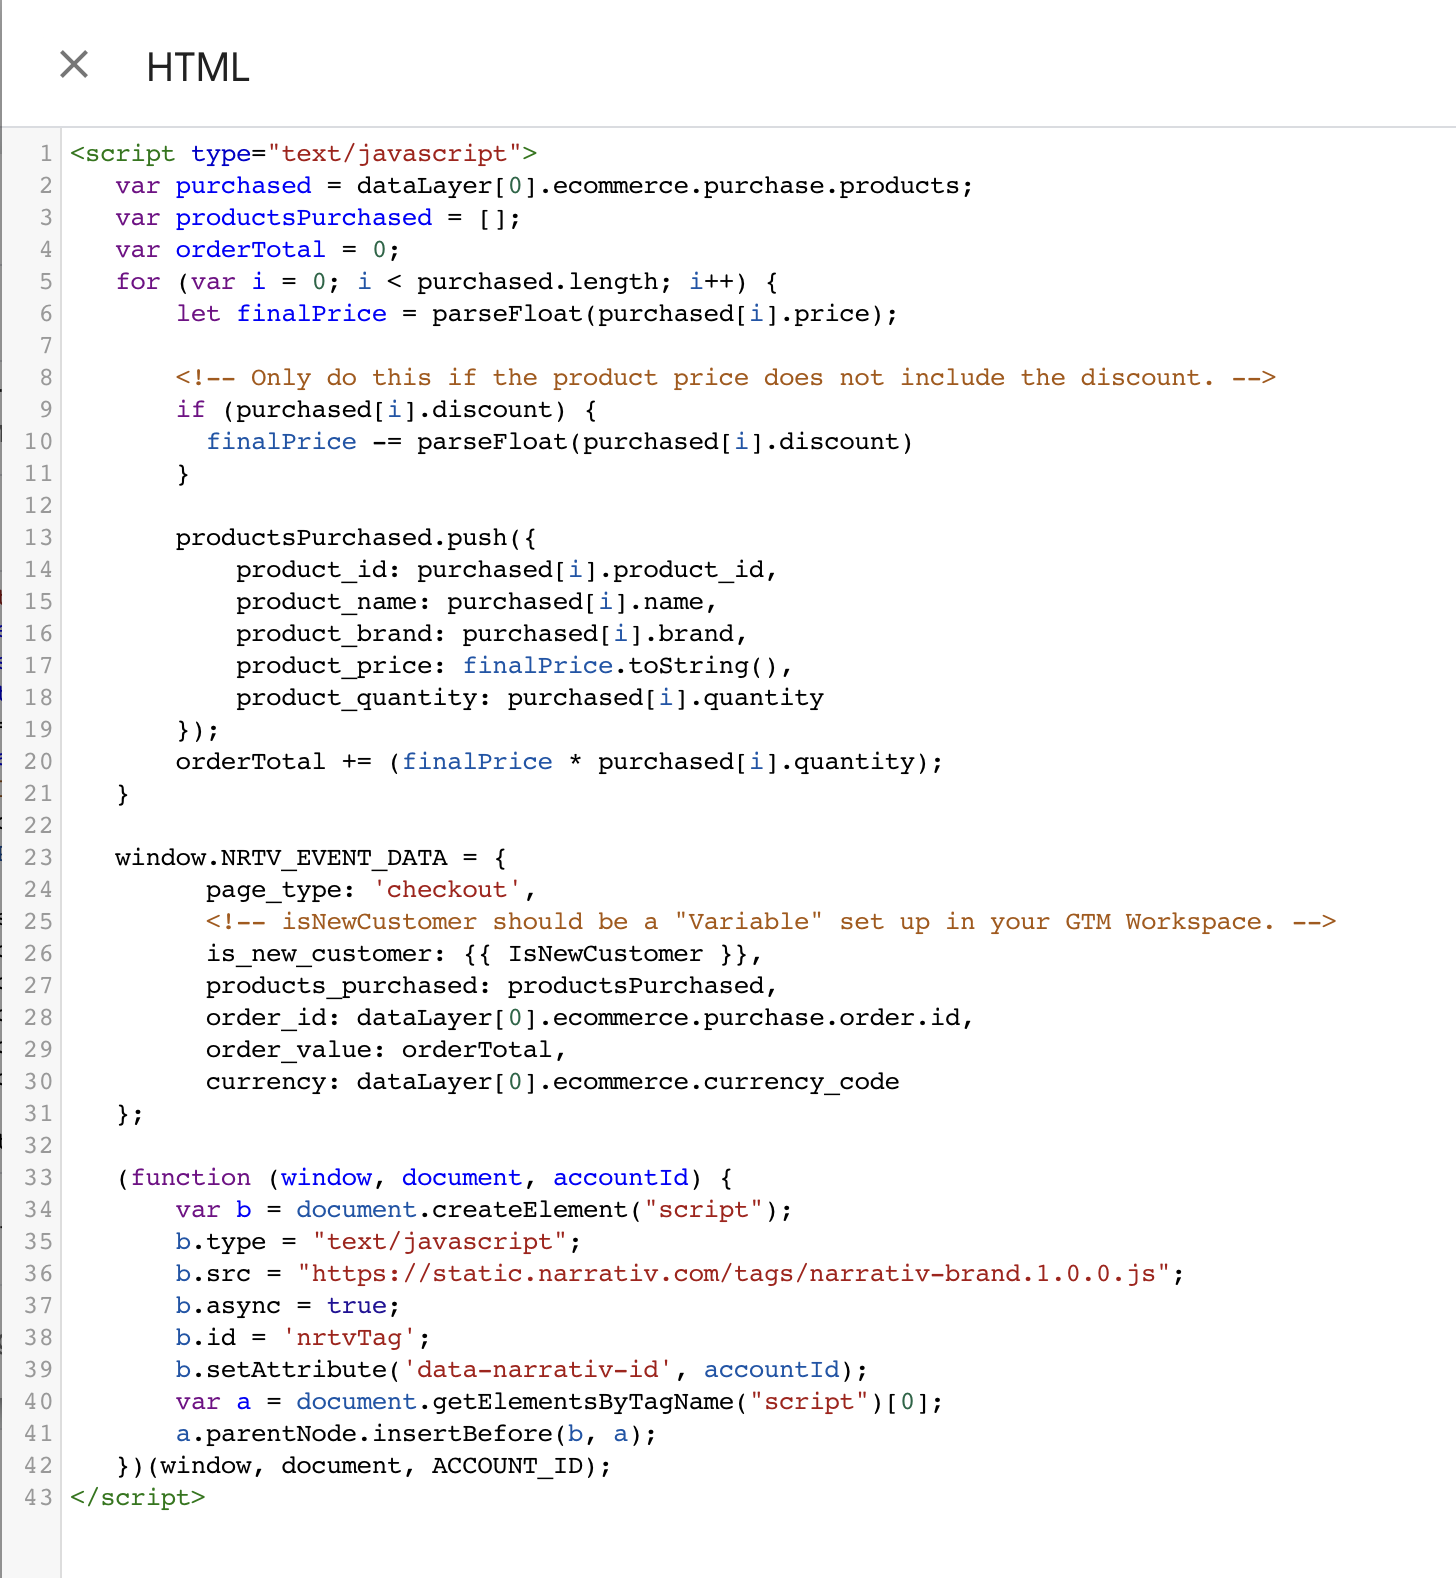
Create a second tag with a Custom HTML configuration titled Howl Checkout Tag. Copy and paste the following
Javascript snippet in the HTML field (pictured below the snippet). Remember to also replace ACCOUNT ID with your
own Howl account id.
var purchasedshould be set to the data layer variable corresponding to products purchased at checkout. This can be defined independent of GTM variables (see previous screenshot), or it can be found in the Variables section of your Tag Manager dashboard. GTM variables referenced in the checkout tag should be wrapped in doubly curly brackets.
<script type="text/javascript">
   var purchased = dataLayer[0].ecommerce.purchase.products;
   var productsPurchased = [];
   var orderTotal = 0;
   for (var i = 0; i < purchased.length; i++) {
       let finalPrice = parseFloat(purchased[i].price);

       <!-- Only do this if the product price does not include the discount. -->
       if (purchased[i].discount) {
         finalPrice -= parseFloat(purchased[i].discount)
       }

       productsPurchased.push({
           product_id: purchased[i].product_id,
           product_name: purchased[i].name,
           product_brand: purchased[i].brand,
           product_price: finalPrice.toString(),
           product_quantity: purchased[i].quantity
       });
       orderTotal += (finalPrice * purchased[i].quantity);
   }

   window.NRTV_EVENT_DATA = {
         page_type: 'checkout',
         <!-- isNewCustomer should be a "Variable" set up in your GTM Workspace. -->
         is_new_customer: {{ IsNewCustomer }},
         products_purchased: productsPurchased,
         order_id: dataLayer[0].ecommerce.purchase.order.id,
         order_value: orderTotal,
         currency: dataLayer[0].ecommerce.currency_code
   };

   (function (window, document, accountId) {
       var b = document.createElement("script");
       b.type = "text/javascript";
       b.src = "https://static.narrativ.com/tags/narrativ-brand.1.0.0.js";
       b.async = true;
       b.id = 'nrtvTag';
       b.setAttribute('data-narrativ-id', accountId);
       var a = document.getElementsByTagName("script")[0];
       a.parentNode.insertBefore(b, a);
   })(window, document, ACCOUNT_ID);
</script>
Discount Code Logic
To ensure the tag captures discount codes, include logic that checks for the presence of a discount
code and applies it proportionally to the product_price variable. Discount codes do not need to be applied to
the order_value variable.
Select “Checkout Page” as the correct trigger for these events and save your changes. Publish both the Impression & Checkout tags to your live environment.